
Think of a webhook as a doorbell for your workflow.
When something happens in one app (like a customer filling out a form, or someone making a payment), that app rings the doorbell, the webhook – which then starts your n8n workflow. No manual clicking. No constant checking. Just instant action.
The old way would be like repeatedly asking, “Did anything happen yet? How about now? Now?” That’s called polling, and it’s slow and annoying.
Webhooks flip the script. Instead of you asking, the app tells you immediately when something happens.
Setting Up Your First Webhook in n8n
Here’s how simple it is,
Step 1: Open n8n and create a new workflow.
Step 2: Click “Add first step” and search for “webhook” node. Add it to your workflow canvas.
Step 3: You’ll see two important things
- HTTP Method: Choose POST if you’re receiving data (most common), or GET if you’re just triggering an action.
- Path: This creates your unique URL – n8n generates one automatically, but you can customize it.
Step 4: Click “Listen for Test Event” at the top of the webhook node. n8n will now wait for incoming data.
Step 5: Copy the test URL that appears. This is your webhook address where other apps will send data.
That’s it. Your webhook is ready to receive data.
Understanding Test URL vs Production URL
Before we dive into real use cases, you need to understand these two critical URL pattern in n8n.
Test URL (Contains /webhook-test/)
- Only for testing inside in n8n
- Works when you click “Listen for test event”
- Stops after one request
- Perfect for quick debugging purpose
Production URL (Contains /webhook/)
- For real integrations with external services
- Only works if the Workflow is ACTIVE
- Always listening 24/7
When Should You Use Webhook in n8n?
Use webhooks when,
- You need instant notifications (new orders, form submissions, payment alerts)
- You’re connecting apps that don’t have direct integrations.
- You want to build custom APIs without coding
- You’re tired of manually checking multiple platforms
Skip webhooks when,
- You need to pull data on your own schedule (use scheduled trigger instead)
- The app you’re connecting doesn’t support webhooks (use polling nodes)
Alright, let’s create a workflow how to use webhook properly.
How to Send WordPress Form Submissions to Google Sheets
Well, this is going to be a good workflow to test it out how webhook actually works. Not only that – I’ll also show you how to make your local n8n setup accessible to the public internet temporarily using ngrok.
Step 1: Set Up the Webhook in n8n
- Create a new workflow in n8n
- Add a Webhook node as the first step
- set the HTTP method to POST (because the form will send data)
- Customize the path to something memorable like
/grab-contacts - Note down this path – you’ll need it in the step 3
Step 2: Making Webhook URL Publicly Accessible
Explanation: When you run n8n locally (e.g http://localhost:5678), your webhook URL might look like this “http://localhost:5678/webhook-test/abcd123” but this only works on your computer – It’s not reachable from the internet. So if a service like WordPress tries to send data to it, it will fail because WordPress can’t reach your localhost.
So we are going to use a tool called “ngrok” that acts as a secure tunnel between the public internet and your local computer.
- Create an account in ngrok – It’s totally free.
- Install ngrok on your windows / mac or linux.
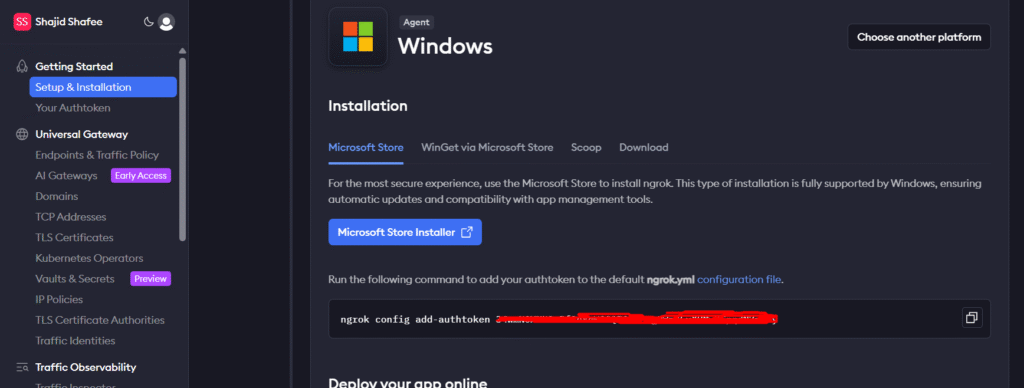
- Setup your ngrok: make sure once installed, open up the terminal, and
ngrok config add-authtoken <your auth token> - Now go to your terminal and type this code
ngrok http 5678
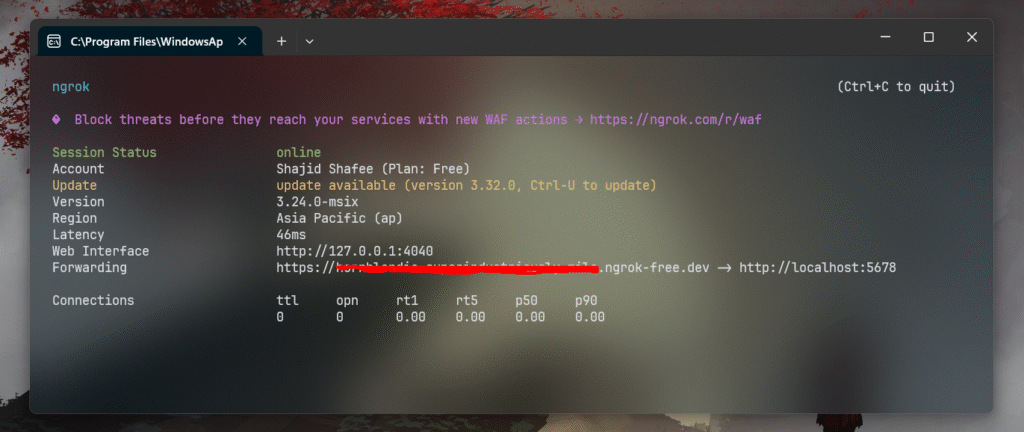
- Now it created a tunnel you’ll get a forwarding address look like in the above image,
https://address.ngrok.free.dev
Step 3: Connect Your WordPress Form
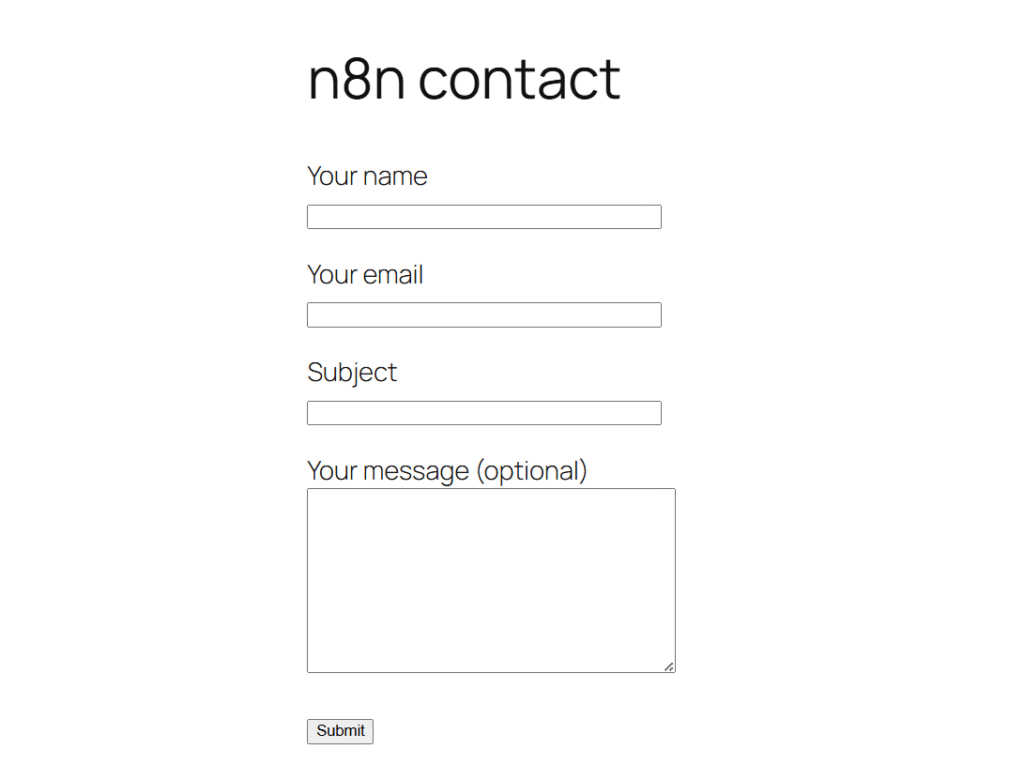
For this tutorial, I made a separate page in WordPress, created a simple form with contact form 7 plugin, and added the shortcode on that page.
- Install the plugin called “Contact Form 7” (most popular WordPress Plugin)
- Install another plugin called “CF7 to Webhook” – so this plugin is an add-on for Contact Form 7 which enables the Webhook integration.
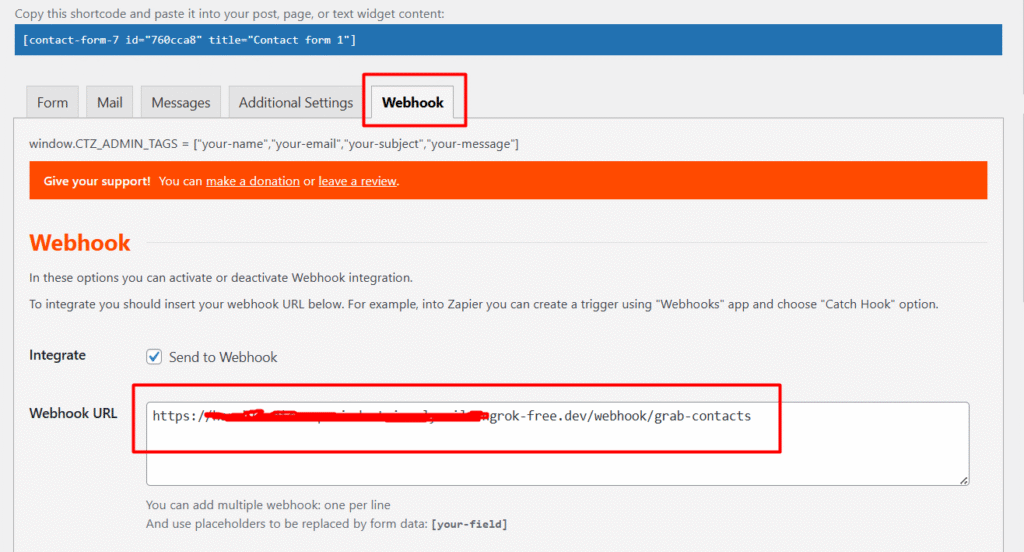
- Go to Your Contact Form 7 settings and find the webhook integration section
- Paste your complete production webhook URL in this format
https://your-ngrok-url.ngrok-free.dev/webhook/grab-contacts
Optional: Understanding Webhook URL Structure
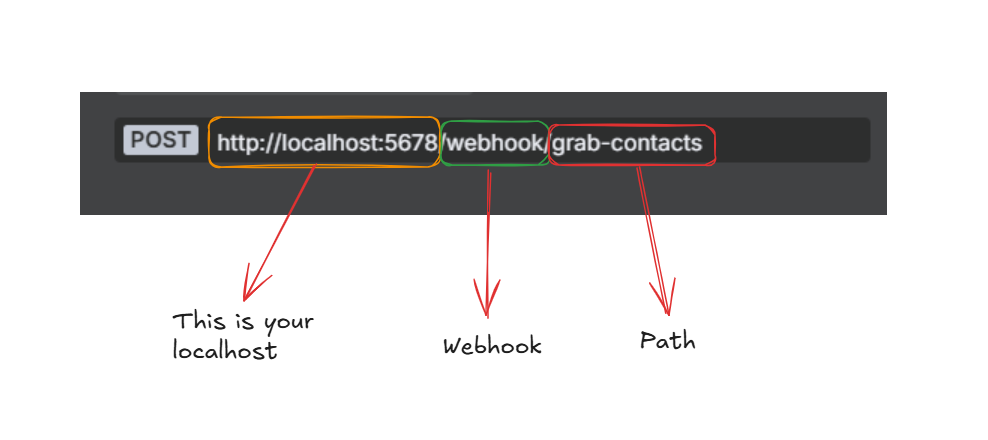
Your complete webhook URL has three parts
- URL: https://your-ngrok-url.ngrok-free.dev (ngrok url) or your localhost. For this tutorial, we go with the ngrok url.
- Webhook prefix: /webhook/
- Your custom path: grab-contacts
Common mistake: Don’t use /webhook-test – that’s only for testing inside n8n. Always use /webhook/ for external integration.
Step 4: Connecting Google Sheet Node
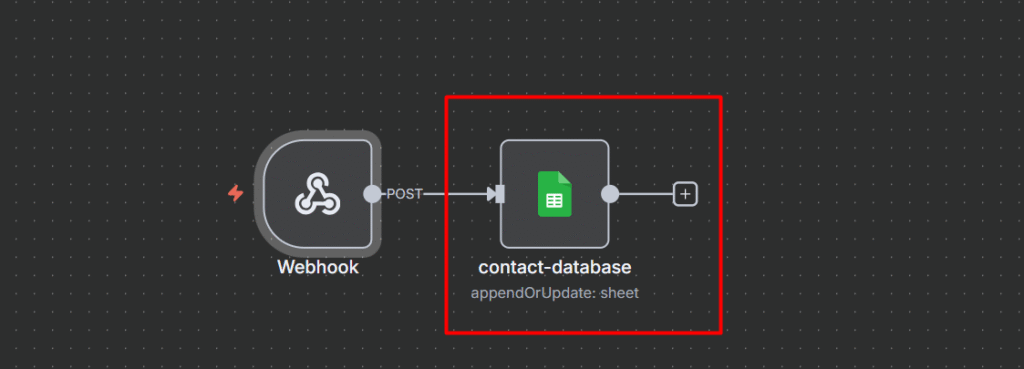
- Insert the next node after the webook as Google Sheet.
- Make sure to add the correct credentials
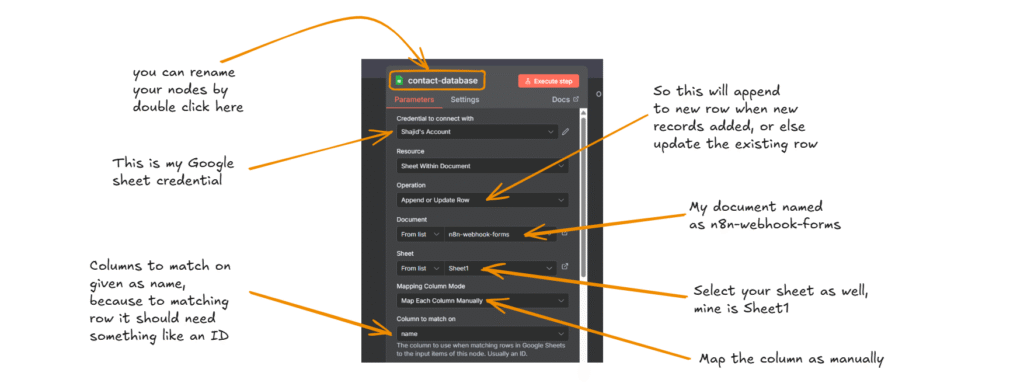
- Operations: Append (this adds a new row each time when the new data comes)
- Or, If you want to avoid duplicates use Append or Update.
- Select your Document and Sheet
- Map each column manually.
- Column to match on as
namebecause names are going to be unique. (However, email is the correct column to match on to avoid duplicate emails) It’s totally up to you.

- Values to send
- `{{ $json.body[“your-name”]}}`
- `{{ $json.body[“your-email”]}}`
- `{{ $json.body[“your-message”]}}`
Step 5: Testing the Workflow
Before testing with WordPress, you MUST activate your workflow.
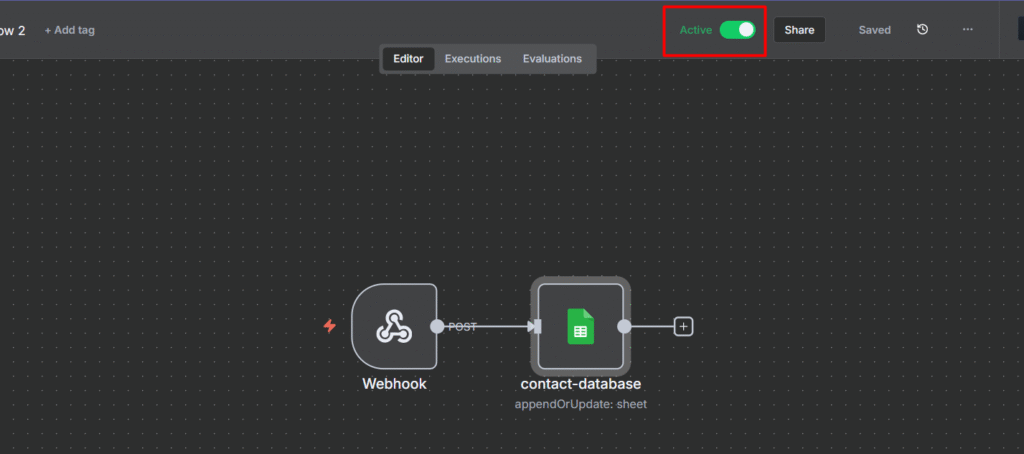
- Click the toggle switch in the top-right corner to turn it “Active“
- Once activated, you’ll see the production URL
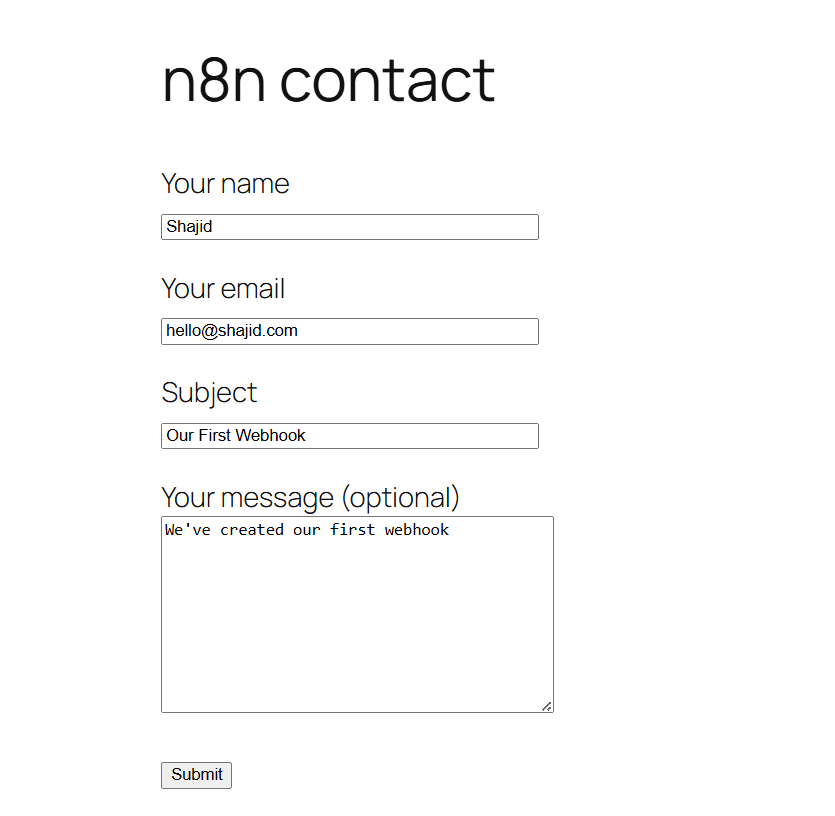
- Go to your form, and submit with the information
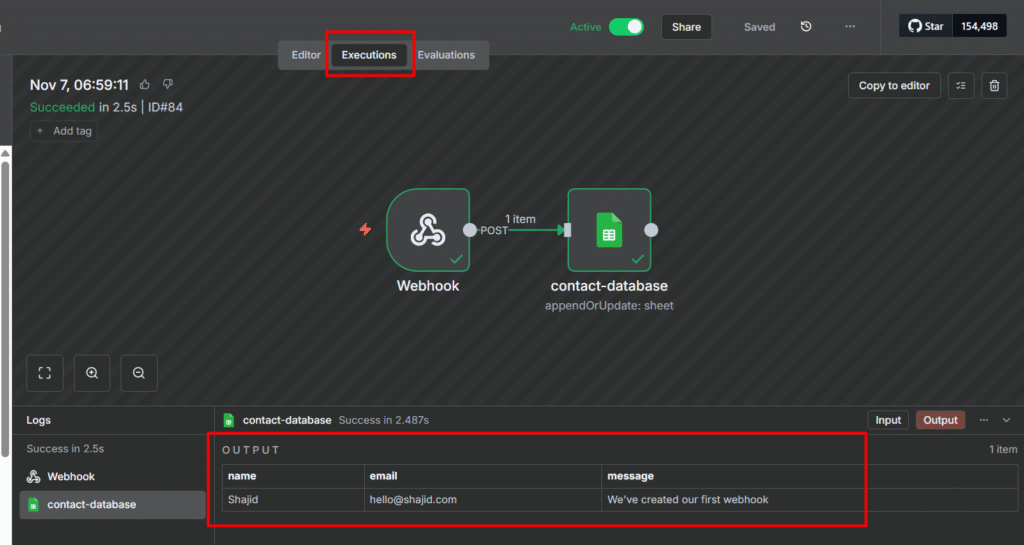
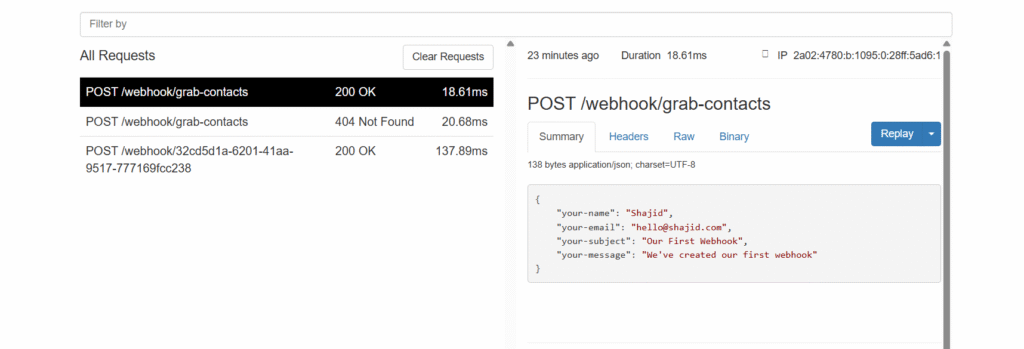
- In n8n, click the Executions tab at the top
- Click on the most recent execution (should be at top of the list)
- You’ll see your workflow with green checkmarks if successful
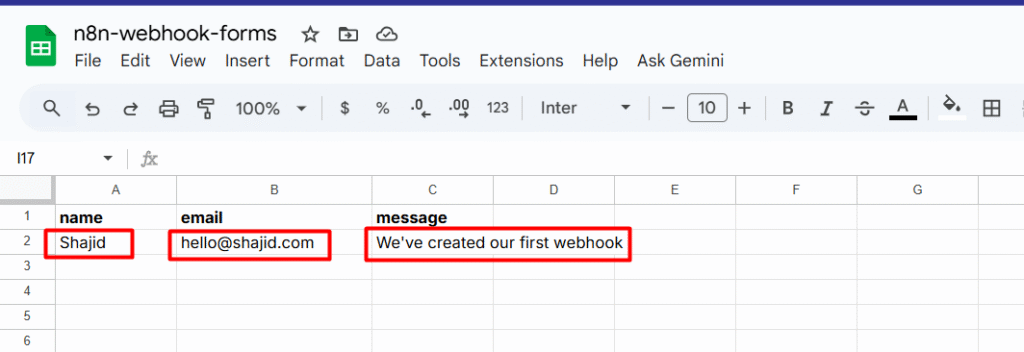
- Check your Google sheet – you should see a new row with the form data
Common Troubleshooting Tips
- There was an error trying to send your message
- Tip: Make sure to activate your workflow, not just listening for test events
- ngrok shows the data but n8n doesn’t
- Tip: Check the ngrok visual inspector by going to http://localhost:4040 in your browser. If you see the POST request there with 200 OK status, ngrok is working fine. The issue is likely that your n8n workflow is not activated. Always check your executions tab in n8n – If executions are appearing but failing. Click on them to see which node has the error
- Data appears in n8n but not in Google Sheets
- Tip: Verify whether your Google sheet is connected properly, and you’ve selected the right spreadsheet.
What You Just Accomplished
Congratulations! You’ve just built a production-ready automation that,
- Captures form submission in real-time (no-delays)
- Automatically saves data to Google sheets
- Works 24/7 without any manual interventions
- Can be extended with additional nodes (slack notifications, passing the data to CRM and much more)
Start with something simple – maybe auto-saving form submissions or getting Slack alerts. Once you see it working, you’ll find dozens of places where webhooks can save you hours every week.
Well, the best part is? No coding required. Just drag, drop, connect, and let your workflows do the heavy lifting.
Now go build something awesome! 🚀