
This tutorial shows you how to build an automated 3-email follow-up sequence in n8n that handles all of that for you.
The workflow checks your contacts list daily, sends the right email to each person based on timing, and stops automatically when someone replies. (Workflow included)
Real use cases: People who downloads your ebook, new lead onboarding, anything where you need to stay in touch without manually tracking 50+ conversations.
Why n8n instead of Mailchimp or Hubspot?
FREE. Unlimited contacts. You own the data. No monthly fees that scale with your list size. You need a paid subscription in HubSpot to enable automated nurturing email sequences. n8n costs $0 if you self-host, or $20/month for unlimited everything on n8n cloud.
But, still there are some downsides as well.
What you need to follow this tutorial?
- Gmail account (or any SMTP email service)
- Google Sheet for your contact list
- n8n instance (self-hosted or cloud)
- Basic n8n knowledge (start here if you’re new)
I’ll show you how to build the simplest version first, a 3 email sequence that actually works. then I’ll explain how to add reply detection and scaling things up.
The Email Sequence Strategy (Before You Build)
Most people jump straight into building workflows and wonder why their sequence feels wrong. The timing is off, or they send too many emails, or not enough.
You should need to decide first before you add your first node.
How Many Emails Should You Send?
Three emails is the sweet spot for most follow-up sequences based on my marketing experience.
- Email #1: Initial contact or First feedback email(reminds them who you are, offer value)
- Email #2: Follow-up (adds context, share resources or case study)
- Email #3: Final check-in (gentle nudge, easy opt-out)
Why nore more? Industry data shows 80% of responses come from the first three emails. Email 4 and 5 mostly annoy people who’ve already decided not to respond.
Long-term nurturing sequences (educational content over weeks/months). But that’s a different workflow. For follow-ups after a meeting or demo, stick with three or anyways you can try out your own phase, maybe more than 3 could work for you too. Alright, let’s stick to the plan.
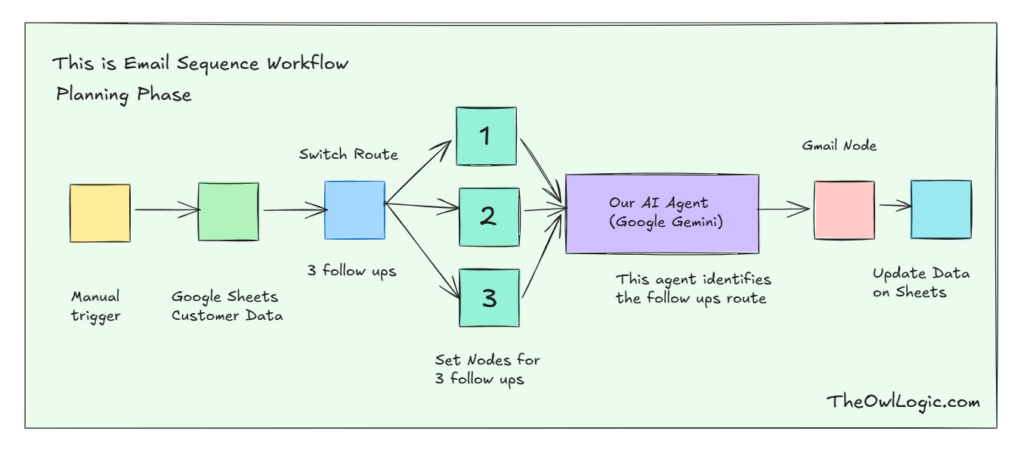
The Workflow Structure (High Level Overview)
Before configuring individual nodes, understand how the pieces going to connect. Let’s start the plan.
The objective: I want to send emails for those who downloaded my marketing e-book
Right now, I’ve their details such as email, full name.
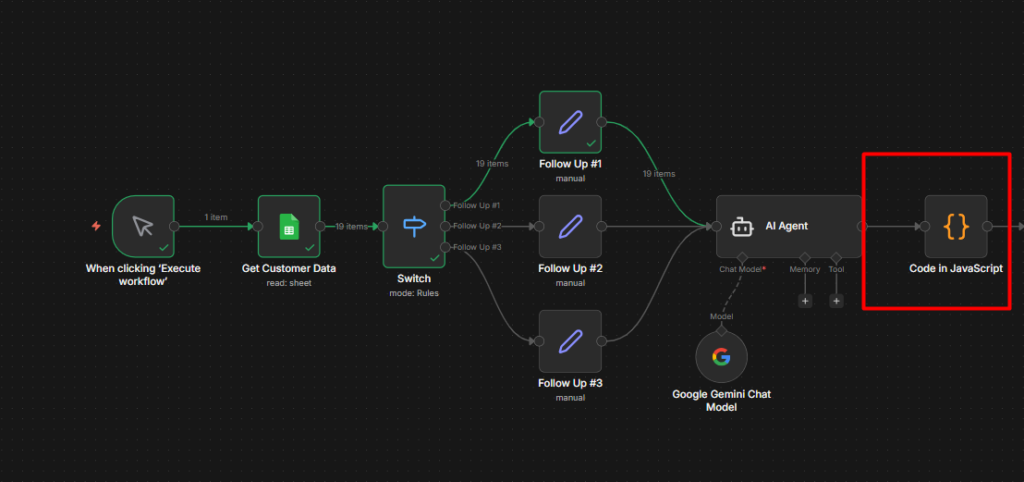
Your email sequence workflows has 6 core nodes
- Manual trigger (for testing) / Schedule trigger
- Google Sheets (Read)
- Switch Node
- Set Node
- AI Agent (Gemini Chat Model)
- Code Node
- Set Node
- Gmail Node
- Switch Node
- Google Sheets (Update)
Building the Workflow
This is where everything comes together. By the end of this section you’ll have a working workflow that reads your contact list, decide which follow-up email to send, generates it with AI, send it via Gmail, and updates your sheet automatically.
Let’s build it step by step.
Step 1: Add The Trigger
For now, use a Manual Trigger while building and testing, We’ll switch this to a schedule trigger later when everything works perfectly.
Step 2: Get User’s Data
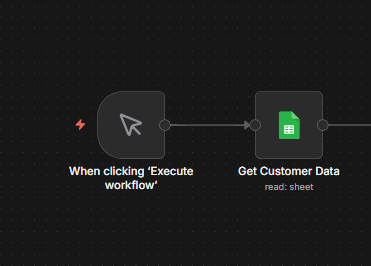
Add a Google Sheets node and connect it to the trigger.
Configurations
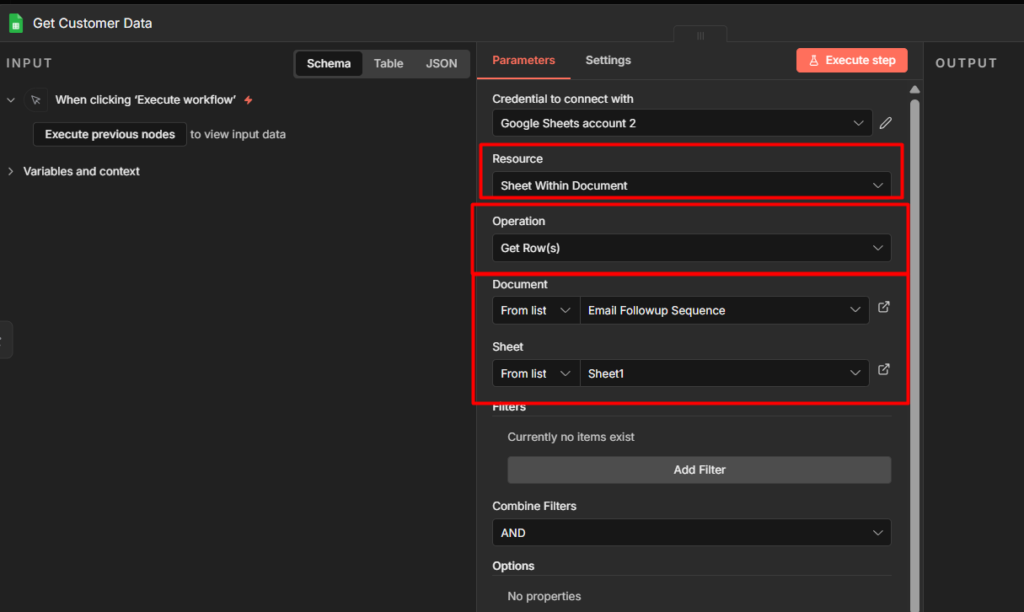
- Resource: Sheet data
- Operation: Read (Get Rows)
- Document: Select your email Follow-up sequence sheet
- Sheet: Sheet1 (for me)
When you execute this node you should see all your user details flowing through separate items.
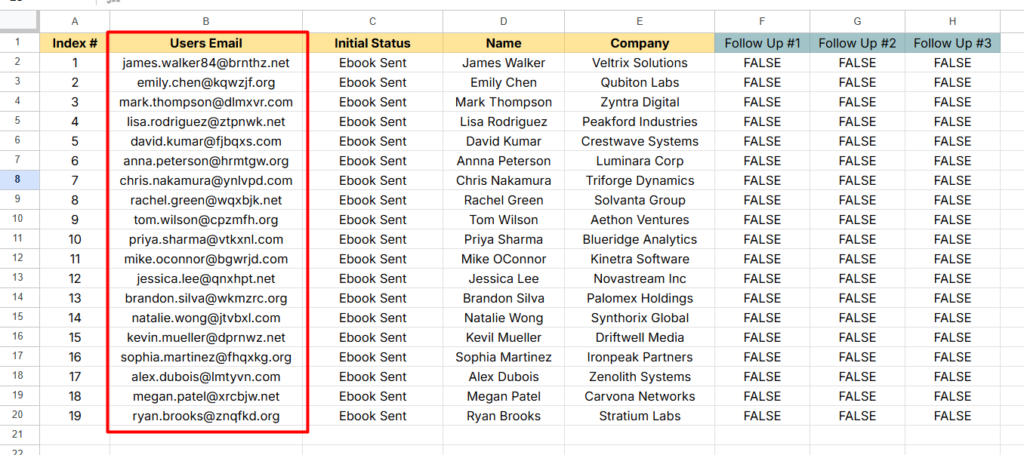
One thing to check: Make sure every row in your sheet has a valid email address in the Users Email column. A single empty row will crash the Gmail node later. If you have blank rows, delete them now.
Step 3: The Switch Node
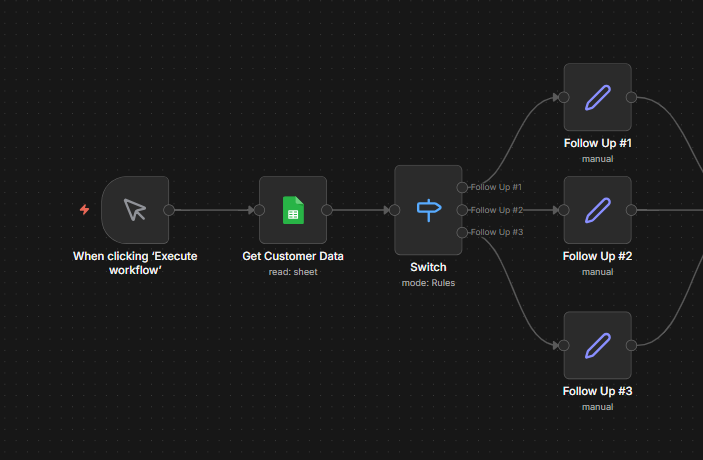
This is the brain of the workflow. The Switch node looks at each column and decides which email they need next.
Read More: How to Build Conditional Logics in n8n (IF / Switch)
Add a Switch node. set Mode to Rules.
Add 3 Rules.
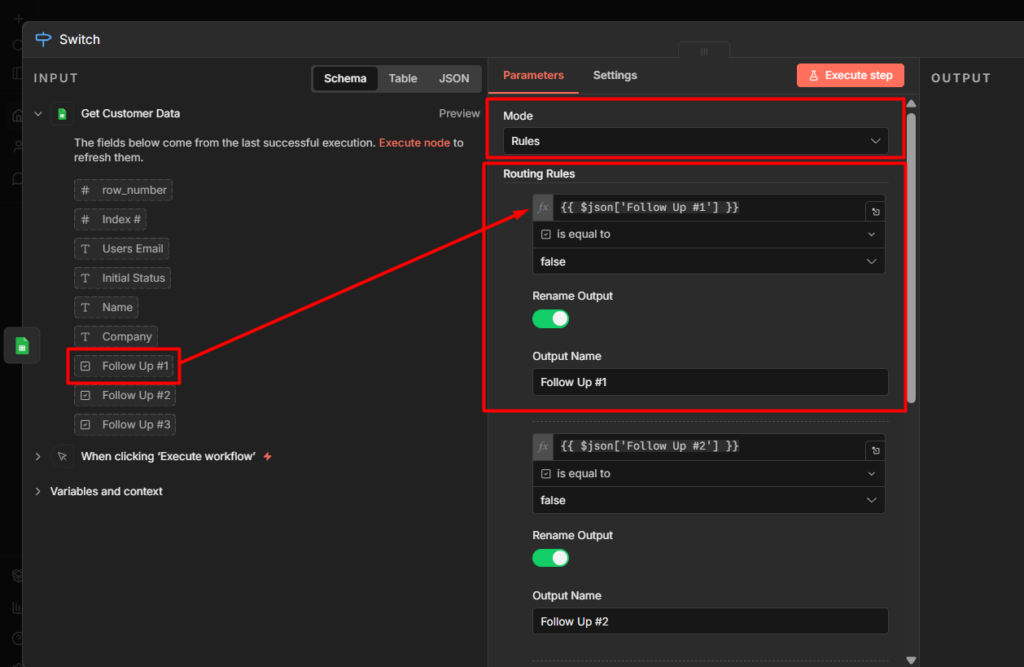
Well, basically, you need to create 3 separate Routing Rules for separate follow ups.
Logics
- If Follow Up is false means we have to send them the follow-up email
- If Follow Up is true means we have sent them the follow-up email
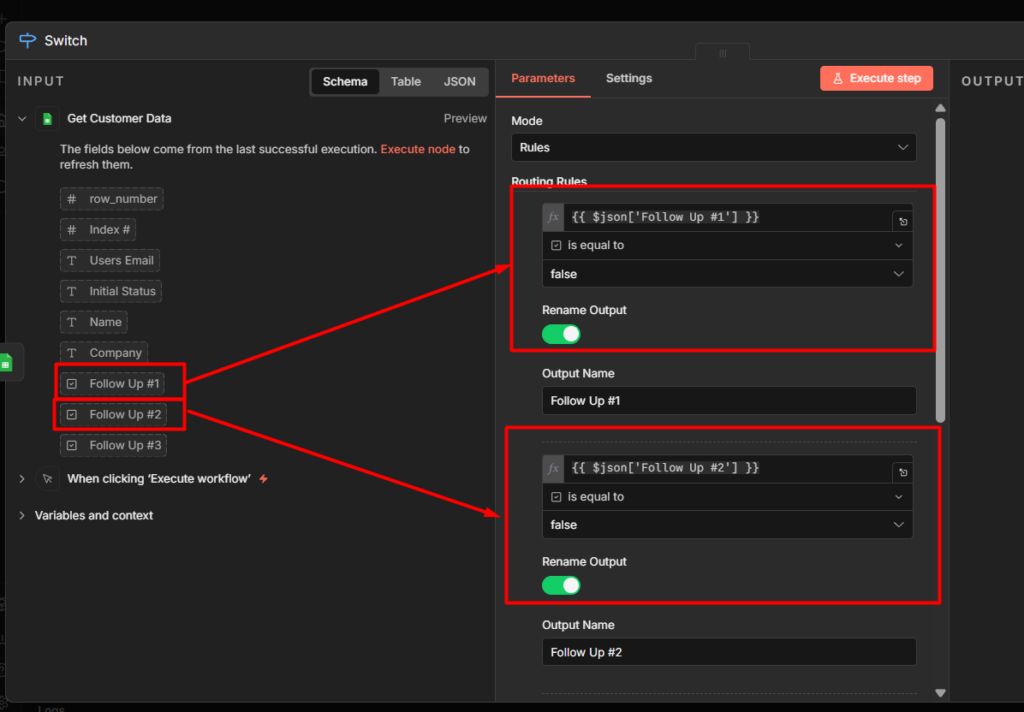
- What you’ve to do is, for 3 routes you have to assign those follow ups column appropriately.
Step 4: Set Node (One Per Route)
Each Switch route needs to know which email it’s sending. Add a SET node on each of 3 routes.
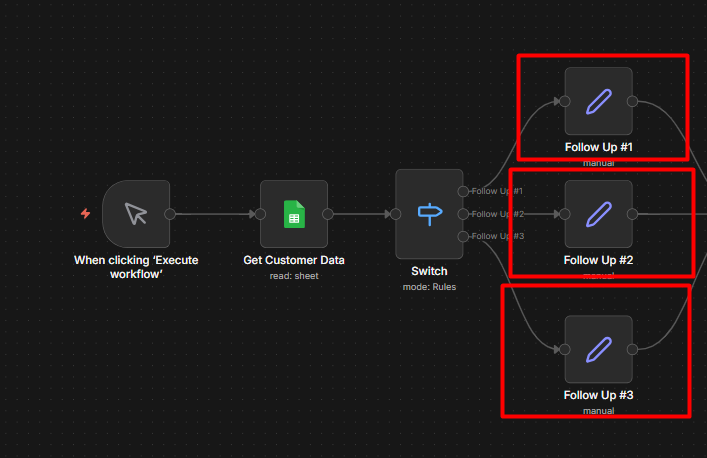
- Make sure add a SET node to it’s Switch follow-up route
- Now add these configurations to SET nodes individually
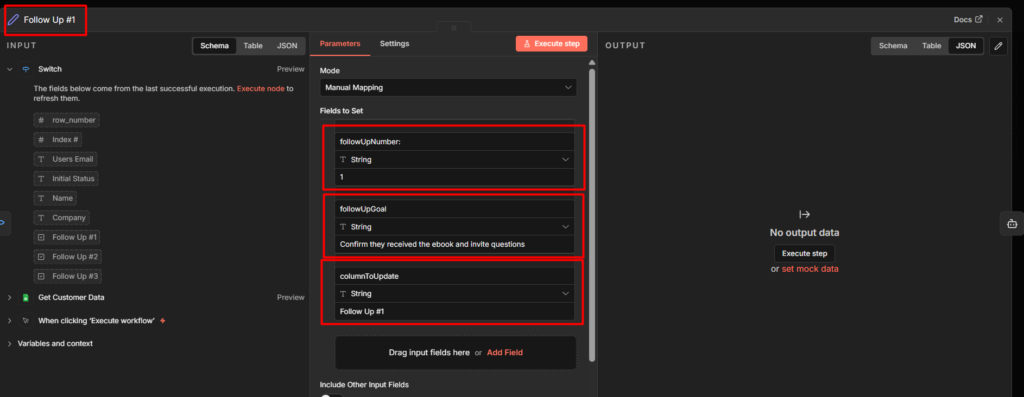
- This is for Follow Up #1
followUpNumber– 1followUpGoal– Confirm they received the ebook and invite questionscolumnsToUpdate– Follow Up #1
- This is for Follow Up #2
followUpNumber– 2followUpGoal– Check if they started reading, share one key insightcolumnsToUpdate– Follow Up #2
- This is for Follow Up #3
followUpNumber– 3followUpGoal– Ask for one-line feedback on the ebookcolumnsToUpdate– Follow Up #3
Make sure to know this, you can add whatever here on the followUpGoal for all these 3 SET nodes. It’s all about giving an additional contexts. You maybe have a different goal, add that goal in one liner.
Step 5: The AI Agent
Add an AI Agent node. Connect Google Gemini Chat Model to it’s Chat Model input.
Now add this system prompt to AI Agent node.
You are an email writer for Shajid from The Owl Logic (theowllogic.com),
a blog focused on n8n automation and workflow development.

Shajid recently launched an ebook about n8n automation. The recipient
downloaded this ebook and you are writing a follow-up email on his behalf.

## Recipient Details:
- Name: {{ $('Get Customer Data').item.json.Name }}
- Company: {{ $('Get Customer Data').item.json.Company }}

## Which Email to Write:
- Follow Up Number: {{ $json['followUpNumber:'] }}
- Goal: {{$json.followUpGoal}}
- Column to Update: {{$json.columnToUpdate}}

## Email Instructions Based on Follow Up Number:

If followUpNumber = 1:
- Subject: "Your n8n Automation Ebook is Ready, {{ $('Get Customer Data').item.json.Name }}"
- Goal: Confirm delivery, tell them what's inside, invite questions
- Tone: Warm welcome, excited but not salesy

If followUpNumber = 2:
- Subject: "Did you get a chance to read it, {{ $('Get Customer Data').item.json.Name }}?"
- Goal: Check if they started reading, share ONE specific insight
  from the ebook to spark curiosity, re-share download link
- Tone: Casual check-in, friendly nudge

If followUpNumber = 3:
- Subject: "Quick question about the ebook, {{ $('Get Customer Data').item.json.Name }}"
- Goal: Ask for one-line feedback, mention you're building more
  resources and their input shapes what gets built next
- Tone: Direct, honest, respectful of their time

## Rules for ALL emails:
- Max 150 words
- Write in first person as Shajid
- Conversational, not corporate
- No emojis
- No marketing language or hype words
- No phrases like "I hope this email finds you well"
- Sound like a real person writing to one person
- End with: "- Shajid"

## Output Format:
Return ONLY this JSON structure, nothing else:

{
  "subject": "email subject here",
  "body": "email body here",
  "columnToUpdate": "{{$json.columnToUpdate}}"
}
You can simply have it in your own way though based on your requirement, for this tutorial, try to copy me until you succeed, after that you can be able to make your own follow-up sequence.
For the prompt (user message)
Write follow-up email {{ $json.columnToUpdate }} for:

Name: {{ $('Get Customer Data').item.json.Name }}
Company: {{ $('Get Customer Data').item.json.Company }}
Goal: {{$json.followUpGoal}}
Column to Update: {{$json.columnToUpdate}}

Return the JSON output only.- We are asking Gemini to write follow-up email
{{ $json.columnToUpdate }}for: which means we are passing down the follow up number whether 1,2,3 – so basically we
Watch this video below for understanding them perfectly.
Step 6: The Code Node to Parse JSON
AI Agent returns everything as one string. This Code node breaks it into a separate fields.
const results = [];

for (const item of $input.all()) {
  // Safety check - skip items without output
  if (!item.json.output) {
    results.push({ json: { ...item.json, error: 'No output from AI Agent' } });
    continue;
  }

  try {
    const raw = item.json.output;

    // Clean markdown code blocks if present
    const cleaned = raw
      .replace(/```json\n?/g, '')
      .replace(/```\n?/g, '')
      .trim();

    const parsed = JSON.parse(cleaned);

    results.push({
      json: {
        ...item.json,
        subject: parsed.subject || 'Follow up from Shajid',
        body: parsed.body || '',
        columnToUpdate: parsed.columnToUpdate || item.json.columnToUpdate
      }
    });

  } catch (e) {
    // If JSON parse fails, log which item failed and why
    results.push({
      json: {
        ...item.json,
        error: `Parse failed: ${e.message}`,
        rawOutput: item.json.output
      }
    });
  }
}

return results;
Step 7: Adding a SET Node (Again)
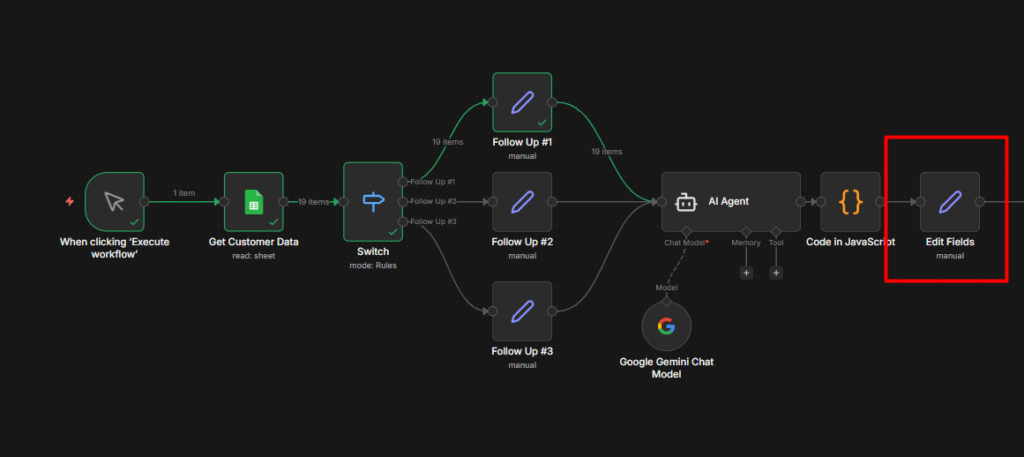
Now we need to separate what code node gives us, perhaps you don’t need this node, but I added here for easy to access data. I don’t want run into any confusion later though.
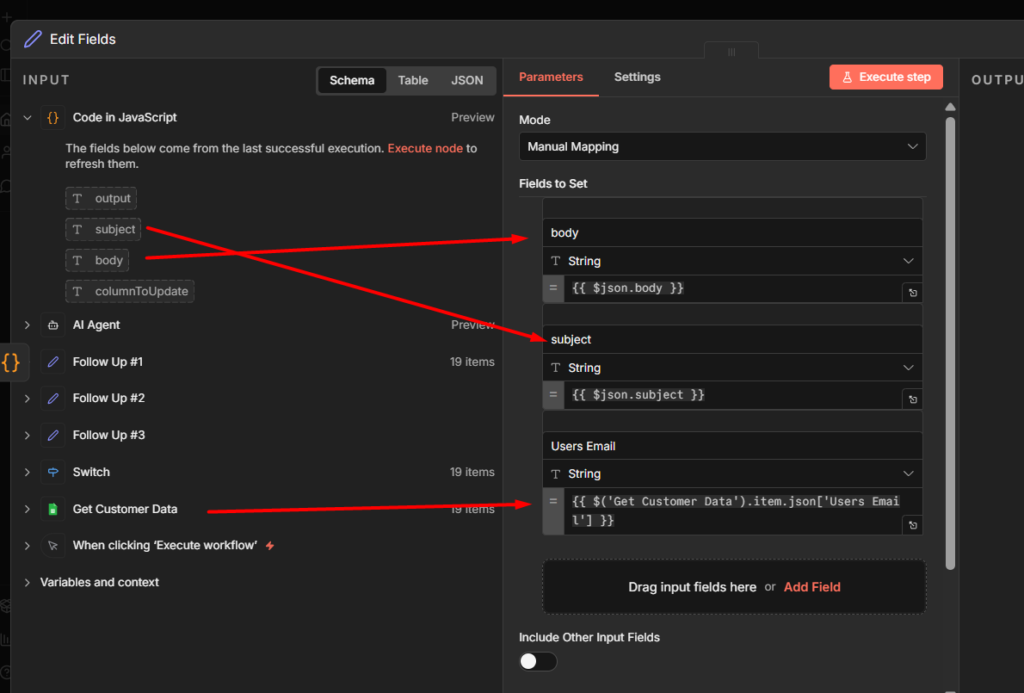
Map the data to SET node from the Code node.
- Add the body
- Add the subject
- Add the Users email from Sheet directly.
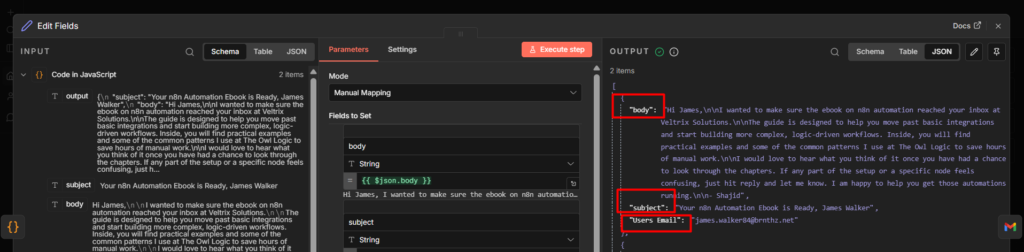
So it should come like this all the information.
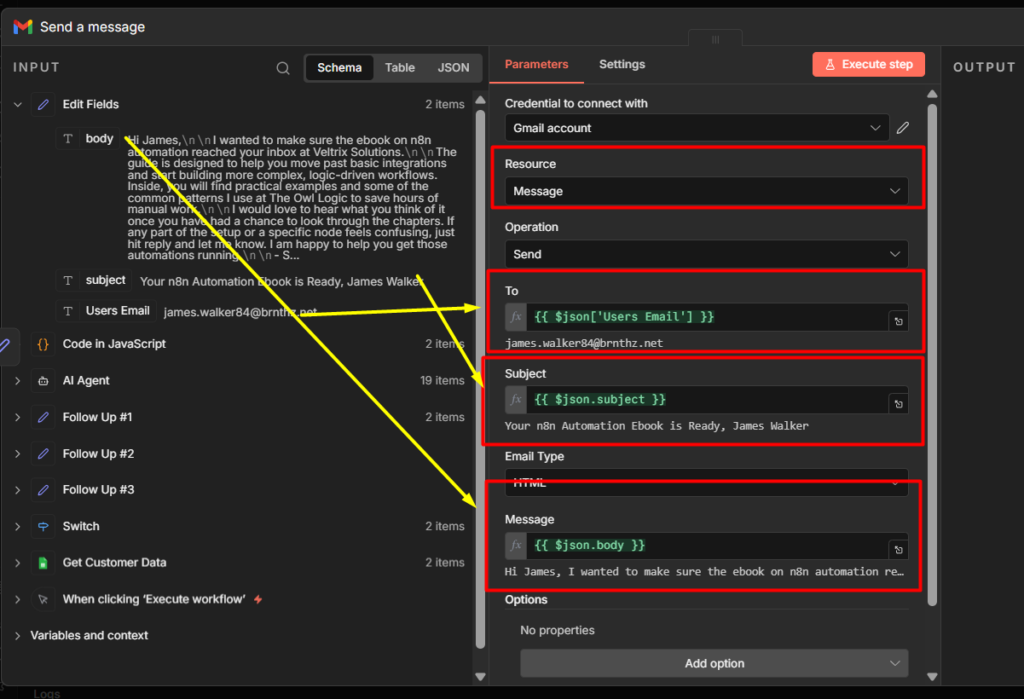
Step 8: Gmail Node
Add a Gmail Node (to send message)
Configuration
- To:
{{ $json['Users Email'] }} - Subject:
{{ $json.subject }} - Email Type: HTML
- Message:
{{ $json.body }}
Step 9: Switch Node to Update Google Sheet
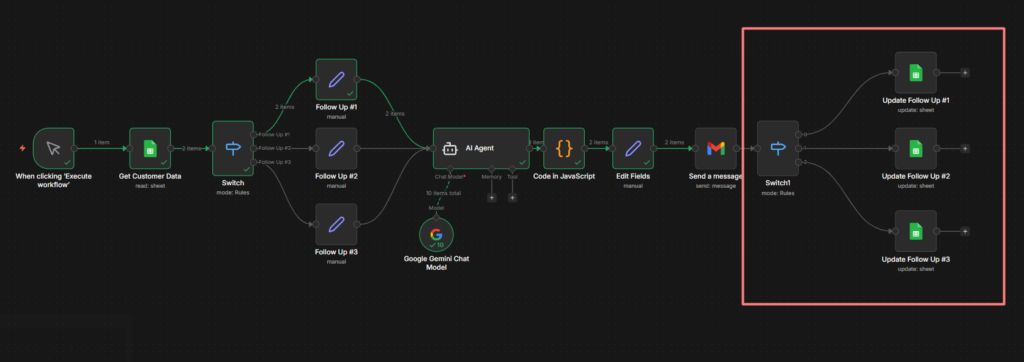
Alright, now we have to connect another Switch Node.
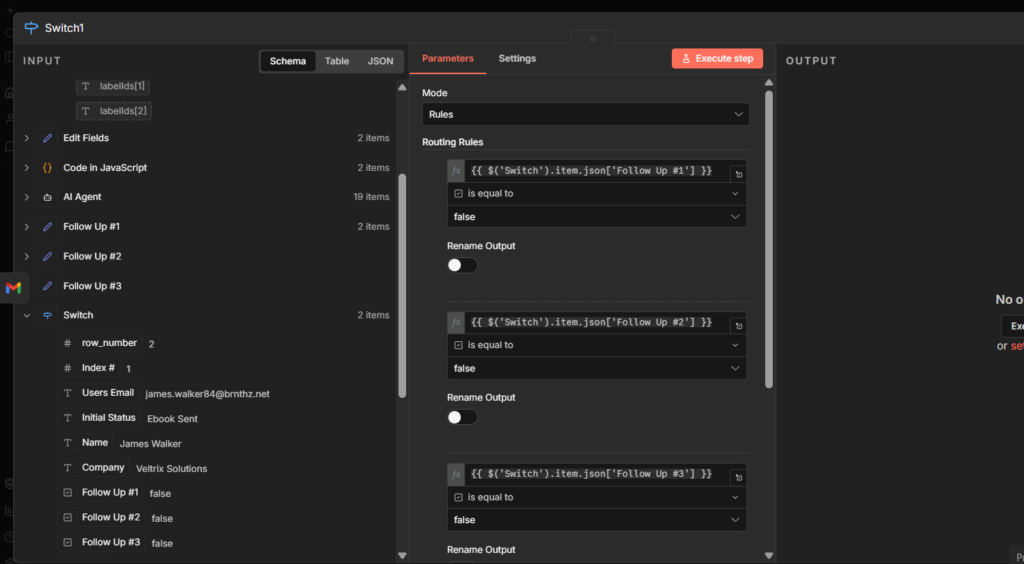
You have to connect the previous Switch nodes state to this new Switch node. Simply drag and drop the Follow Up #1 and create a Routing rule.
Make sure to create 3 separate routing rules for Follow Ups, like how I did.

Step 10: Add Google Sheets to Per Route
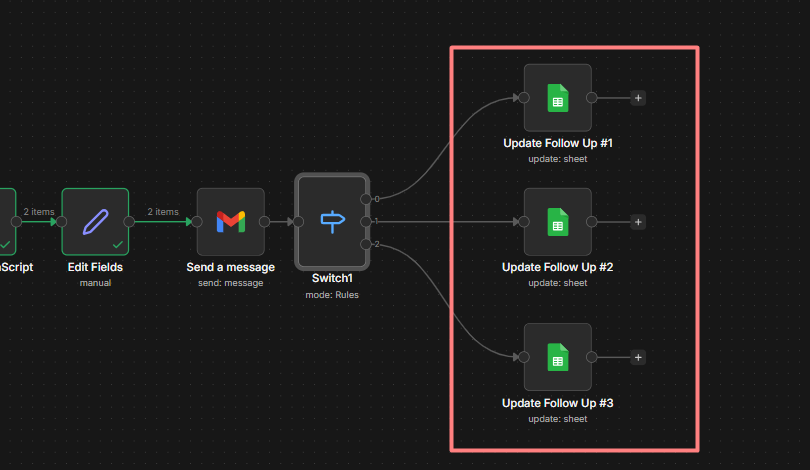
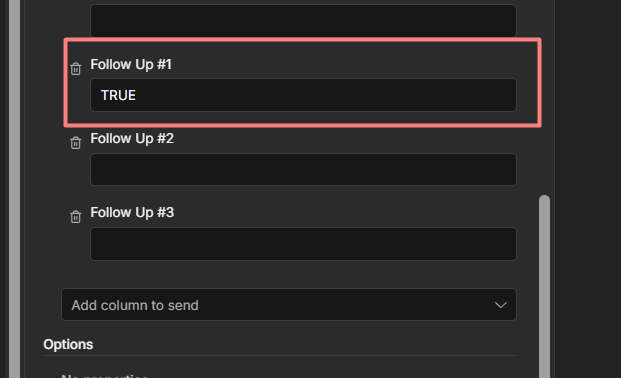
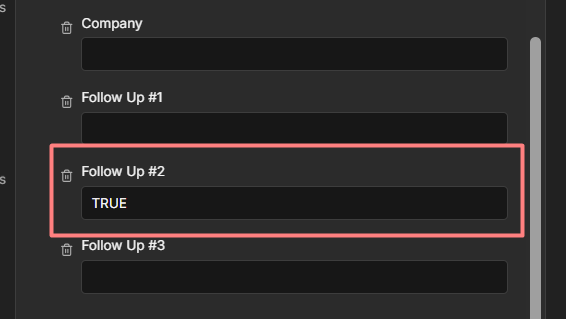
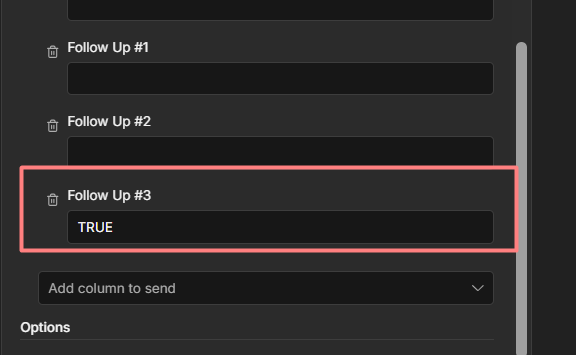
Now we have 3 different routes for follow-ups, and we need to attach 3 different Google Sheet (update) nodes to the each route.
Configuration
- Operation: Update Row
- From List: Your Document
- Sheet: Sheet 1 (mine)
- Mapping Column Mode: Map Each Column Manually
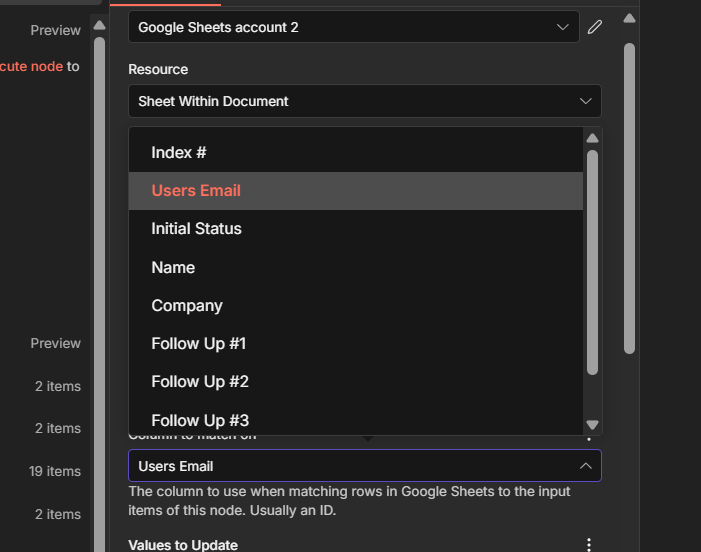
- Columns to Match On: Users Email
Make sure to understand this, for each route has follow up.
- Route 1: Follow Up #1: You need to Update the Google Sheet Follow Up #1 Column to TRUE, and keep others empty
- Route 2: Follow Up #2: You need to Update the Google Sheet Follow Up #2 Column to TRUE, and keep others empty
- Route 3: Follow Up #3: You need to Update the Google Sheet Follow Up #3 Column to TRUE, and keep others empty
Final Execution Email Follow-Up


So literally before you add your contact lists, you work with one email for testing, whether everything works perfectly, including the formatting, After that gradually test with 5, 10, 20, 30 and once passed without any failure. You can move on with your lists.
Frequently Asked Questions
How do I add delays between follow-up emails?
Don’t use Wait Nodes for multi-days delays. They block your entire workflow – if Contact 1 hits a 3-day wait, every other contact get stuck behind it.
The correct approach: Scheduled trigger + date in your Switch conditions.
Your workflow runs daily and asks “has enough time passed?” instead of sitting open for 3 days.
Add a Last_Email_Date column to your sheet. Each Update node writes today’s date after sending. The Switch condition checks how many days have passed before sending the next email.
Can I Use SMTP instead of Gmail?
Yes. Replace the Gmail node with n8n’s Send Email node and plug your SMTP credentials.
Good free options SendGrid (100/day), Brevo (300/day), Mailgun(1,000/day trial)
Gmail works fine for testing and small lists. Switch to SMTP when you hit over 200+ contacts per day.
Can I Connect MailChimp or ActiveCampaign?
Yes. Instead of the Gmail node, use n8n’s Mailchimp or ActiveCampaign node to add contacts directly into their automations.
That said, if you’re already building this in n8n, you don’t need them. n8n + Gmail handles everything for almost for free.
How do I stop the sequence if someone replies?
That requires a second workflow running alongside with this one, The second workflow.
- Monitor your Gmail inbox using an Email trigger (IMAP) node
- Check if the sender’s email matches anyone in your Google Sheet
- If Yes, update their statuses to mark sequence complete.
Well, make sure to subscribe to our email newsletter for more information regarding this workflow. You can directly talk to me regarding any issue with this workflow or to make this workflow great.
My Final Thoughts
You just built an AI-powered follow-up email sequence from scratch in n8n.
No mailchimp subscriptions. No hubspot invoices, Just n8n. Pure play.
What’s next? If you want this running fully or autopilot without manual executing it, switch to a Schedule trigger, with data math as I mentioned above. Workflow handles timing on it’s own.
Well, This is all up. You can grab the Workflow JSON here.