
I hope you had a great experience creating your first hello world workflow. This post is part of my complete n8n beginner guide — covering everything from install to AI agents
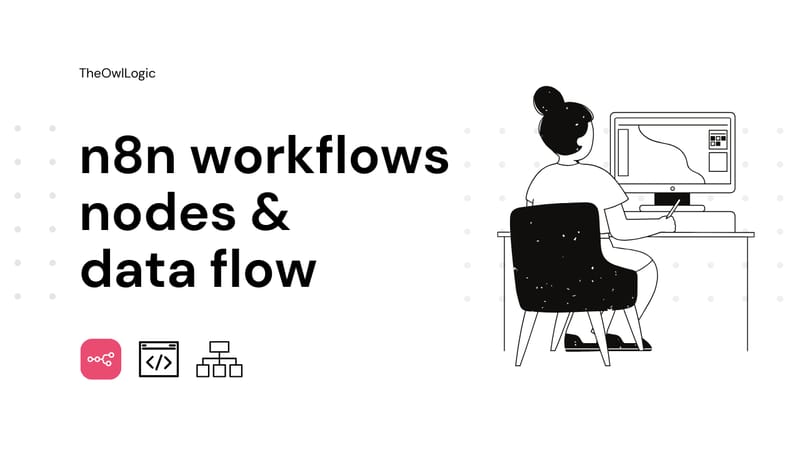
In n8n, you need to understand how to plug appropriate nodes, and how to pass the data. This guide is going to explain and simplify the core mechanisms.
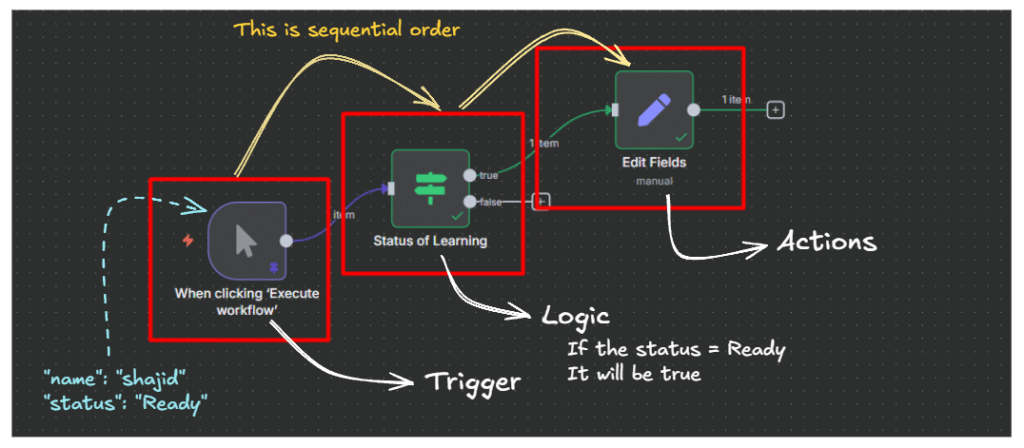
What is a Workflow?
Think of Workflow as a chain of dominoes. The first one falls (the trigger), and it sets off a chain reaction where the each domino (node) knock down the next, creating an automated sequence of events.
In a n8n, a workflow is your canvas where you visually design the automation by connecting different nodes together. Each workflow has,
- A trigger – What starts the workflow whether manual trigger, on a scheduled call or On webhook call.
- Actions – What happens when triggered (sending emails, updating database, calling APIs)
- Logic – How data flows and decision are made out along the way.
Understanding Nodes: The Building Blocks
Nodes are the individual building blocks of your workflow. Each node performs a specific function, like connecting to service, transforming the data, or making a decision.
What makes nodes powerful is their simplicity. Each one does ONE thing really well. One node might fetch data from an API, another might filter that fetched data, and third might send it somewhere. By connecting those focused nodes together, you can build complex automations.
Every node has 3 distinguish parts,
- Inputs – what data it receives from the previous nodes.
- Configuration – Settings that control how it behaves.
- Outputs – The results passes to the next node.
You can click on any node to configure it, test it independently, and see exactly what data it’s working with. And you can reuse the same type of node multiple times in a workflow – Need to call three different APIs? Just add three HTTP request nodes just simple as that.
Types of Nodes
In n8n, nodes fall into 3 main categories, and understanding these categories is crucial to building workflows that work. Each type plays different role in your automation.
Trigger nodes start your workflow – Every workflow needs exactly one trigger to tell it when to begin execution.
Action nodes that do the actual work – They’re like “Do that” part. These nodes interact with external services, manipulate data, and perform the operations you want to automate. You’ll typically use multiple action nodes in a single workflow.
Logic nodes control your workflow – They’re the decision makers and traffic controllers for your workflow. They determine which path your data takes, whether certain steps should run, and how data from different sources combines.
Below table would gives a comprehend list of nodes that you can start off right away.
| Node Category | Node Name | What it Does | When to Use it |
| Trigger | Manual Trigger | Starts workflow with a button click | Testing workflows or on-demand automation |
| Trigger | Webhook | Starts when receiving HTTP request | Integrating with external services, form submissions |
| Trigger | Schedule Trigger | Starts at specific times/intervals | Daily reports, regular data syncing, scheduled tasks |
| Trigger | Gmail Trigger | Starts when new email arrives | Email automation, inbox monitoring |
| Trigger | Google Sheets Trigger | Starts when row is added/updated | Form responses, spreadsheet-based workflows |
| Action | HTTP Request | Calls any REST API | Connecting to services without native nodes |
| Action | Gmail | Sends emails | Email notifications, confirmations |
| Action | Slack | Posts messages to channels | Team notifications, alerts |
| Action | Google Sheets | Reads/writes spreadsheet data | Data storage, reporting, logging |
| Action | Postgres/MySQL | Database operations | Storing structured data, querying records |
| Action | Set | Creates or modifies data fields | Cleaning data, preparing for next node |
| Action | Code | Runs custom JavaScript/Python | Complex transformations, custom logic |
| Logic | IF | Routes data based on conditions | Different actions for different scenarios |
| Logic | Switch | Routes to multiple paths | Categorizing data, complex routing |
| Logic | Merge | Combines data from multiple nodes | Bringing together different data sources |
| Logic | Split in Batches | Processes items in groups | Handling large datasets, API rate limits |
| Logic | Wait | Pauses workflow execution | Delays between actions, waiting for events |
| Logic | Filter | Keeps only items matching criteria | Removing unwanted data before processing |
Alright, that’s so far great, and let’s learn these nodes individually with practical examples to create your next workflow right away.
Trigger Nodes
This specific node is the starting point, whether you can manually click on it to start the workflow, or maybe by triggering an external event that would start the workflow. I have listed below the main important trigger nodes that can be start a workflow in various ways.
Trigger Manually
- Simplest trigger in the n8n, It just waits for you to click the “Execute workflow” button. that’s it then workflow will start to run.
- Testing and Development: Build your workflow step by step without waiting for real triggers.
- On-demand Automations: Tasks you want to run manually when needed.
- Learning: Understanding how nodes work without any external dependencies.
On App Event
Triggers when something happens in external application like Gmail, Google Sheets, Slack, or any integrated service.
How it Works: n8n connects to the app and listen for specific events. When that event occurs (like a new email, a row added to a sheet, or a file uploaded), your workflow starts automatically.
Common App Event Triggers
- Gmail Trigger – New email arrives in your inbox.
- Google Sheets Trigger – Row is added or updated
- Google Drive Trigger – File is created or modified
- Slack Trigger – Message posted in a channel
- Airtable Trigger – Record is created or updated
A simple real world example, “When a new row is added to my ‘Leads” google sheet, send the details to our CRM and notify the sales team in slack”
On a Schedule
Triggers your workflow at specific time or intervals – like a cron job or alarm clock for your automation.
How it Works: You define when the workflow should run, Every hour, daily at 9:00 AM, every Monday, or custom intervals. n8n’s scheduler handles the rest.
A simple real world example, Daily report generation at 8 AM on Weekdays.
On Webhook Call
Triggers when n8n receives an HTTP request to a unique URL – perfect for integrating with external services or building APIs.
How it works: n8n gives you a unique webhook URL. When any service sends and HTTP request (GET, POST, PUT, etc.) to that URL, your workflow starts, and the request data becomes available.
This is one of a powerful node, you know why?
- Instant – No polling delay, executes immediately.
- Universal – Any service that can make HTTP requests can trigger your workflow
- Flexible – Receive data in JSON, form data, or query parameters.
Real world example, When you receive a payment from Stripe, and then webhook listens to it, and update it database and as final outcome, sends receipt to the user which means you don’t need to send receipts manually. That’s great isn’t it.
On Form Submission
A specialized trigger for handling form submissions – essentially a webhook configured specifically for forms with a built-in form page.
How it works: n8n generates both a webhook URL and a hosted form page. Users fill out your form, submit it, and the data triggers your workflow.
When Executed By Other Workflow
Allows one workflow to trigger another – essentially building modular, reusable automation components.
How it works: Workflow “A” includes an Execute Workflow node that calls Workflow B. Workflow B starts with “When Executed by Another Workflow” trigger and receives data from Workflow A.
On Chat Message
Triggers when a message is received in the chat platforms – build chatbots and conversational automations.
How it works: n8n connects to chat platform (Telegram, Discord, Slack, WhatsApp, etc.) and listens for messages. When a message arrives, your workflow processes it and can respond.
When Running Evaluation
A specialized trigger for testing and quality assurance workflows, particularly for AI and LLM applications.
How it works: Used in conjunction with n8n’s evaluation and testing features to run workflows against test datasets and validate outputs.
Note for beginners: This is an advanced trigger. Unless you’re specifically building testing or AI evaluation workflows, you likely won’t need this one when starting out.
There are multiple use cases for this specialized trigger.
- Testing LLM prompt outputs.
- Validating data transformation
- A/B testing different workflow paths
- Quality assurance for automated process
Other Ways
n8n is flexible and support additional trigger methods
Workflow trigger node: similar to “When Executed By Another Workflow” but with more control and error handling options
Error Trigger: starts workflow when another workflow encounters an error – perfect for error handling and alerting.
Custom Triggers: Using Code node with HTTP request nodes, you can build custom trigger logic for specialized use cases.
Action Nodes
Action nodes are where the magic happens, while trigger nodes start your workflow, action nodes perform the actual tasks, calling APIs, sending emails, updating databases, transforming data, and connecting to services.
Here we are going to show you the most essential action nodes to kick start your automation like a pro.
HTTP Request Node
I personally call this node as “The Swiss Army Knife for n8n” that connects to virtually any API or web service that speaks HTTP.
Should You Use This As A Beginner? Honestly? Maybe not yet. This node is incredibly powerful, but it requires understanding APIs and web requests. If you’re just starting with n8n, focus on nodes like Gmail, Slack, and Google Sheets first – they’re designed to be beginner-friendly. Come back to HTTP Request when you’re comfortable with n8n basics.
But if you’re ready to learn…
Just imagine that you want piece of information from a website, but you thinking without opening them in your browser, you want your workflow to fetch it automatically. The HTTP request node is like sending a messenger to a website to either,
- Ask for information (like checking the weather)
- Deliver information (like submitting a form)
- Update information (like changing your profile)
What It Does: Makes HTTP request (GET, POST, PUT, DELETE, etc.) to any URL. If a service has an API, this node can talk to it.
Gmail Node
Send, read, and manage emails directly from your workflows.
What It Does: Full Gmail integration – send emails, read messages, add labels, search inbox, and more.
Slack Node
Post messages, create channels, and interact with Slack workspaces
What It Does: Send messages to Slack channels or users, perfect for team notifications and alerts.
Google Sheets Node
Read from and write to Google Sheets – your cloud-based database for simple workflows.
What It Does: Full Google Sheets integration – add rows, update cells, read data, create sheets.
Common Operations
- Append Row: Add new data to bottom of sheet
- Update Row: Modify existing rows
- Lookup: find rows matching criteria
- Read: Get all data from sheet
Google Drive Node
Stores and manages files in Google Drive automatically. Upload files, create folders, download documents – all from your workflow
Example: you receive form submission with attachments > Save each attachment to a Google Drive folder named by date.
Beginner tips: Create a dedicated “n8n uploads” folder in Drive first. Then always upload to that folder – Keep things organized.
Airtable Node
Airtable is like Google sheets but more powerful – It’s a database that looks like a spreadsheet. This node lets you create, read, update, and delete records.
Example: customer fills out contact form > Create new record in Airtable “Leads” table > Team sees it instantly in their Airtable base.
Postgres Node (Database)
Connects to a PostgreSQL database to store, retrieve, and manage data using SQL queries.
Should Beginner Use This? Probably not at first. Postgres is powerful but requires,
- Understanding database architecture.
- Writing SQL queries
- Setting up a database server
If you’re beginner then start with Google Sheets, Airtable for now, once you had the enough knowledge about the database, then you can easily migrate to PostgreSQL.
Logic Nodes
Logic nodes don’t fetch data or send emails – they control HOW your workflow runs. They make decisions, combine data, filter items, and direct traffic.
IF Node
Makes a simple yes/no decision. If the condition is true, data goes one way. If false, it goes another way.
Example: Check if the order amount is over $100
- True path > Send to priority fulfillment + VIP Email
- False path > Send to standard fulfillment + regular email
Beginner tips: Start with simple conditions. Don’t try to check multiple things at once – use multiple IF nodes instead.
Switch Node
Routes data to different paths based on multiple conditions. Like IF node, but with more than two options.
Beginner tip: Always include a fallback route (Output 3) for data that doesn’t match any condition.
Filter Node
Removes items that don’t match your criteria. Only items passing the filter continue to the next node.
Beginner Tip: Use Filter early in your workflow to reduce items. Processing fewer items = faster workflow based on my personal experience.
Merge Node
Anytime your workflow splits into multiple branches and you need to bring them back together. That’s what happening in the merge node.
Split In Batches Node
Breaks large lists into smaller groups and processes them one group at a time. For an example, Instead of processing 1000 items at once, process 10 groups of 100 items.
Why Use It?
- API Rate Limits – Many APIs only allow X requests per minute
- Performance – Processing 1000 items at once can crash workflows
- Control – Add delays between batches
Example: Send 500 emails, but Gmail limits to 100/minute
Beginner warning: This node creates a loop. Make sure you understand loops before using it, or your workflow might run forever.
Wait Node
Pauses your workflow for a specific amount of time before continuing. It is like a hitting the pause button. The Workflow sleeps, then wakes up and continue.
Example: Send a welcome email immediately, wait 3 days, send follow-up email.
Data Flow
Every nodes receives data from the previous node and passes it’s output to the next node. it’s really like running a relay where each runner (node) passes the baton (data) to the next runner.
What you need to understand
- Each node outputs JSON data.
- The next node receives the data as input
- You can reference data from previous nodes using expressions.
Debugging Data Flow
When things go wrong in your workflow (and, they will)
Check it out here: How to handle errors in n8n
- “No Data” error > Previous node returned empty results
- Solution: Check that node’s output tab
- “Field undefined” error > You’re referencing a field that doesn’t exist
- Solution: Inspect the data, check exact field names (case-sensitive!)
- “Node not found” error > You renamed a node but expression still use old name
- Solution: Update all expressions to use new node name
- “Too many items” error > Workflow is slow or timing out
- Solution: Add Filter node early, use Split in Batches for large datasets
Your First Data Flow Exercise
Try building this simple workflow to practice
- Manual Trigger > Click to Start
- Set Node > Create fake data
{
    "name": "your name",
    "task": "learn n8n"
}- Code Node > Add
return [{json: {...item.jsonm message: Hello ${item.json.name}!}}]- Execute > See how data transforms yourself.
Remember: Understanding the data flow is what separates beginners from builders. Take time to inspect, experiment, and see how data transforms. It’ll definitely click, I promise.
Final Thoughts
I’m still learning n8n myself. I still google “how to do X in n8n” more than I’d like to admit. I still build workflows that completely fail the first time I run them or goes out of the context in terms of logical.
But you know what changed? I went from “This is overwhelming” to “Oh! I know which node to use for this”. That shift happens faster than you think, usually around your 3rd or 4th workflow.
The community is super helpful. The documentation is solid. And most importantly, every problem you run into, someone else has already solved and posted about.
So if you take nothing else from this guide, remember start small, test often, and don’t be afraid to peek at other people’s workflow for inspiration.
Your automation journey starts with a single manual Trigger node. Everything else builds from there.