
I was literally spending 5-8 hours every week manually transferring the data – traffic metrics, source channels, sales figures and more.
Everything was manual, day-to-day grunt work.
As a business owner, when work piles up (and it always does), I’d skip the data processing entirely.
Those tasks would just pile up into my backlog, creating even more stress down the line.
Then I thought: enough, Let’s automate with n8n.
I integrated Google Sheets with n8n, and now everything runs on autopilot. EVERYTHING.
In this post, I’m going to show you exactly how to integrate Google Sheets to n8n. Step by step. This is a beginner friendly guide that assumes zero prior automation experience.
Prerequisites
Before we integrating Google Sheets with n8n, make sure following ready.
1. An n8n account or Self-hosted instance.
You’ll need access to n8n to build your workflow. You’ve got two options
- n8n cloud (Recommended for beginners): Sign up for free account at n8n.cloud. No installation required, and you start building workflows immediately.
- Self-hosted n8n instance: If you prefer running n8n on your server or locally, follow this guide How to install n8n locally (Window + Mac)
For this tutorial I’m using a local instance.
2. A Google Account
You need a Google account to access Google Sheets and Google Cloud Console. If you don’t have one, create a free account.
3. Google Cloud OAuth Credentials (Already Setup)
To connect Google Sheets with n8n, you’ll need OAuth credentials from Google Cloud Console.
If you haven’t setup this yet, follow our comprehensive guide here: Complete n8n credentials and services guide
This guide covers
- Creating a Google Cloud Project
- Enabling Google Sheets API
- Setting OAuth 2.0 credentials
- Connecting credentials to n8n
Already have credentials but they keep expiring? Check out our troubleshooting guide here How to Fix n8n credentials Expiring Issues
Once your Google OAuth credentials are connected to n8n, come back here continue with the integration workflow.
4. A Google Sheet to Work With
Create a simple Google Sheet to to test the integration. You can use existing spreadsheet or create a new one with simple data.
5. Basic Understanding of Spreadsheets
You don’t need a coding experience here. If you know how to use Google Spreadsheet (rows, columns, basic data entry), you’re ready to go.
Step 1: Setting Up Your First Google Sheet Workflow

Create a New Workflow
- Log in to your n8n account
- Click on “New Workflows” in the left sidebar
- You’ll see a blank canvas – this is where your automation playground
Add a Manual Trigger
Every n8n workflow needs a trigger to start it. For testing purposes, We’ll use a manual trigger, which lets you run the workflow whenever you click the execute button.
Why manual trigger? We want to test everything manually before setting up automated triggers like, schedules, or webhooks. This gives full control during the learning phase.
Rename Your Workflow
Rename the workflow to something useful, Always use clear, descriptive names. When you’re managing 10+ workflows, you’ll thank yourself for this habit.
Step 2: Connect Your Google Sheets Node
Configuring Google Sheets Node
- Click on the “+” icon next to your manual trigger.
- In the search bar, “Google Sheets”
- Click on the “Google Sheets” to add it to your editor.
You’ll see the node configuration panel open on the right side.
There are many operations for sheets, Append, Update, Delete, Create, Get and etc.
For this tutorial, we are going to use GET operation Get row(s) to read what is inside on the Google Sheets.
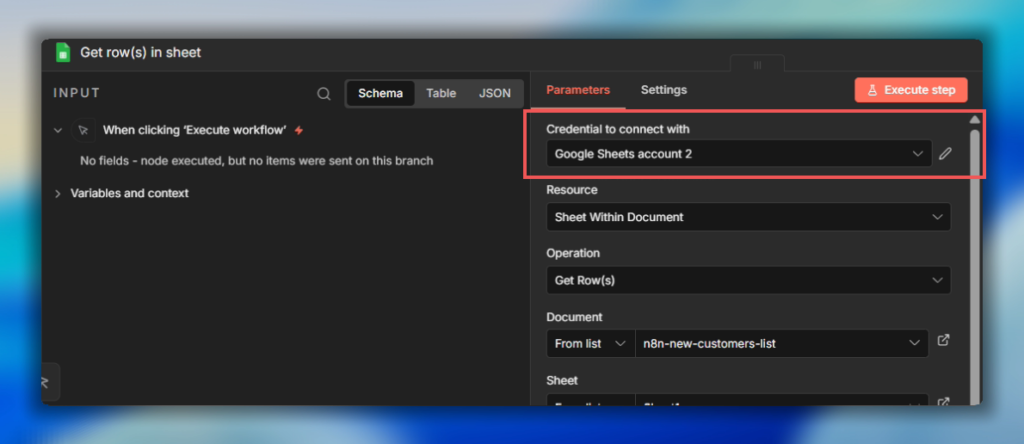
Credentials to Connect With
Click on the “Credentials to connect with” dropdown and select your Google OAuth credentials that you’d already setup.
Don’t see your credentials here? Go back to our n8n credentials and services to set it up.
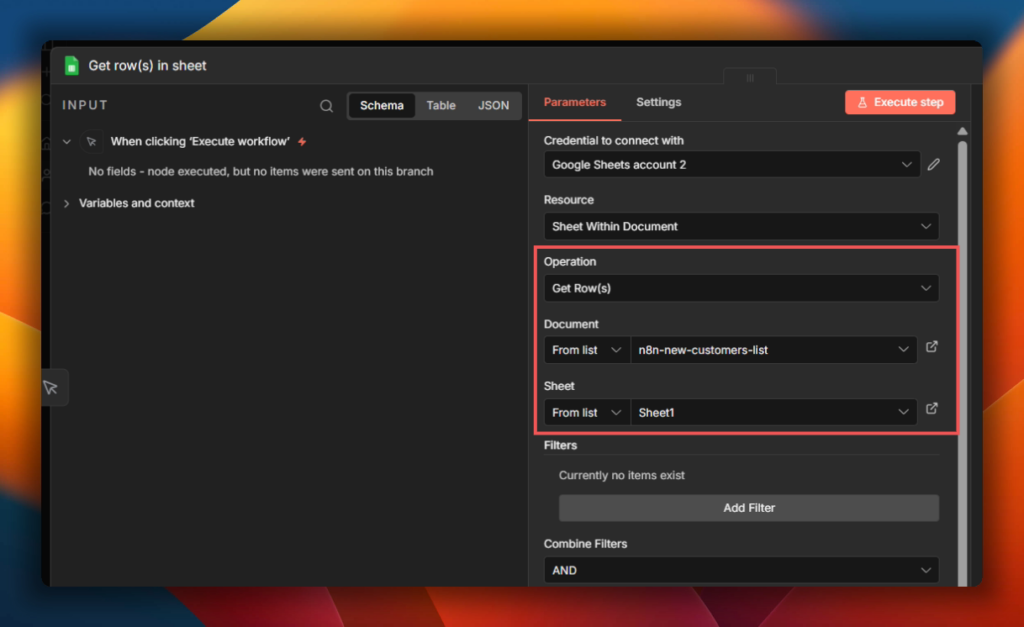
Document: Select Your Google Sheet
You have three ways to select your spreadsheet
- From List: Choose from your recent Google Sheets (easiest)
- By URL: Paste the full Google Sheets URL
- By ID: Use the spreadsheet ID from the URL
For beginners, select “From List” and choose your test spreadsheet from the dropdown.
Sheet: Select Your Sheet Tab
If your spreadsheet has multiple tabs (Sheet 1, Sheet 2, etc). Select which one you want to read from.
In my case, I’m using Sheet 1.(the default tab name)
Step 3: Execute The Workflow

Time to see the magic happen! let’s run this workflow and fetch Google Sheets data.
Run Your First Test
- Make sure both nodes are connected (you should see a line in between them)
- Click “Execute Workflow”
What happens next?
n8n will connect your Google Sheet, fetch all the rows, and display the data in the output panel below the Google Sheets node.
Congratulations You’ve just fetched (read) data from Google Sheets to n8n.
What you can do from here?
Now that you have sheet data flowing into n8n, the automation possibilities are endless.
- Filter and process the data using n8n’s built-in nodes
- Send data to other apps like Gmail, Discord, Slack, etc
- Transform the data with code, AI or data manipulation nodes
- Trigger action based on specific values in your sheet
- Append new data back to same or different sheet
Common Google Sheets Operations Explained
Now that you’ve successfully read data from Google Sheets, let’s explore the other essential operations you’ll use most frequently. Understand these will give you the foundation to build any Google Sheets automation with n8n.
Append Row – Adding New Data
When you want to add new entries to the bottom of your spreadsheet (like logging form submission, new leads or daily reports).
How it works?
- Add a Google Sheets node to your workflow
- Select “Append Row” from operations dropdown
- Choose your spreadsheet (document) and sheet
- Map the data you want to add to each column
Update Row – Modifying Existing Data
When you need to change information in specific rows (like updating order status, making tasks complete, or changing contact details).
How it works
- Add a Google Sheet node
- Select “Update Row” from Operations
- Choose your spreadsheet (document) and sheet.
- Specific which row to update (or use column matching to find the right row)
- Map the new values for each column
Important: You need a way to identify which row to update. You can either use
- The row number (if you know it)
- Match by unique column value (like email or order ID)
Append or Update Row – Smart Data Handling
When you’re not sure if a record already exists. This operation check first, then either updates the existing row or creates a new one.
How it works
- Same structure as choosing sheet nodes.
- Choose your spreadsheet (document) and sheet
- Define the column to check for existing records (like email or ID)
- Map your data
Why this is so powerful? This prevents duplicate entries while keeping your data up-to date automatically.
What You’ve Learned
Let’s recap what you’ve learnt in this tutorial
- Set up Google Sheets integration with n8n – You connected your Google account and configured OAuth credentials to enable secure communication between n8n and Google Sheets.
- Created your first automation workflow – You build a working n8n workflow from scratch, understanding how nodes connect and execute
- Successfully fetched data from Google Sheets – You use the “Get Row(s)” operation to pull spreadsheet data into n8n, which is the foundation for any Google Sheets automation
- Understood the essential operations – You now know the difference between, Append, Update and Append & Update. When to use each one.
Your Turn & Share Your Progress
The best way to solidify what you’ve learned is to build something yourself.
Got your workflow working? Awesome, here’s what you have to do next?
- Experiment freely – try combining different operations, break things, and rebuilt them.
- Start small, then scale – don’t jump straight into complex 20-node workflows. Master simple 2 – 4 node flows first.
- Document your workflows – Use n8n’s notes feature to add comments explaining what each node does.
- Build something real – The best practice project is one that solves an actual problem you have. What manual tasks could you automate today?