
Sub-workflows let you call one workflow from another workflow. Instead of rebuilding same automation in multiple places, you build it once and reuse it like a component.
Why it really matters?
Let’s say you’re validating customer addresses (for an example). You check if the street address exists, verify the postal code format, and make sure the city matches the state.
That’s maybe 6-8 nodes doing the validation.
Now you need the same validation in three different workflows – one for new orders, one for customer profile updates, and one for shipping.
Without sub-workflows, you copy those 6-7 nodes into all three workflows.
- Order workflow: has address validation nodes
- Profile workflow: has the same address validation nodes (copied)
- Shipping workflow: has the same address validation nodes (copied)
When the postal service changes their validation rules, you have to update all three workflows.
With sub-workflows, you build one address validation workflow. Then your other three main workflows just call it. Update the validation once, and all three workflows automatically use the new rules.
But sub-workflows aren’t always the answer. Sometimes they add complexity you don’t even require. perhaps a simple IF node or loop does the job better.
This guide shows you when sub-workflows actually help.
This is an advanced topic in n8n – If you’re a beginner, better to read our Complete Beginner’s n8n Guide first to understand this topic.
When to Use Sub-Workflows in n8n
Use sub-workflows when you’re dealing with one of these situations
Reusable logic across workflows – When you’re copying the same node group into multiple workflows. Data validations, API calls with specific error handling, report generation, anything you do more than once is a candidate.
Memory issues in a massive workflows – Workflows with 50+ nodes can hit memory limits. Breaking them into smaller sub-workflows gives each piece it’s own execution context
Modular testing – Testing a 50-node workflow means running all 50 nodes. Testing a 10-node sub-workflow in isolation is faster and catches issues earlier.
Human-in-loop – Need approval, sub-workflows handle these cleanly and return the approval result to the parent.
Don’t use sub-workflows when
- Simple branching is enough – An IF node handles “do X if true, Y false” that’s totally fine. Don’t build a sub-workflow for a 3-node branch
- When you’re doing batch processing – Loop over items processes arrays within a single workflow.
- If you’re never going to reuse it, and then don’t use it.
How Sub-Workflows Work
A sub-workflow is just a regular n8n workflow that another workflow calls.
The parent workflow sends data to the child workflow. The child does it work. The it sends results back to the parent.
Here’s what happens
- Parent workflow hits a Execute Sub-workflow node
- Data get passed to the child workflow
- Child workflow runs from start to finish
- Final output returns to the parent
- Parent continues with the returned data
By default, the parent wait for the child workflow to complete. The workflow execution pauses at Execute Sub-workflow node until the child finishes.
I checked that Sub-workflow executions don’t count toward your monthly execution quota if you were in n8n cloud. n8n only counts the parent workflow execution. This means you can call sub-workflows as much as you want without burning through your plan limits.
Enough theory, Let’s see it in action.
Let’s Build It: The Address Verification System
Let’s build a scenario here.
Copy the spreadsheet content if you’d like to create your own
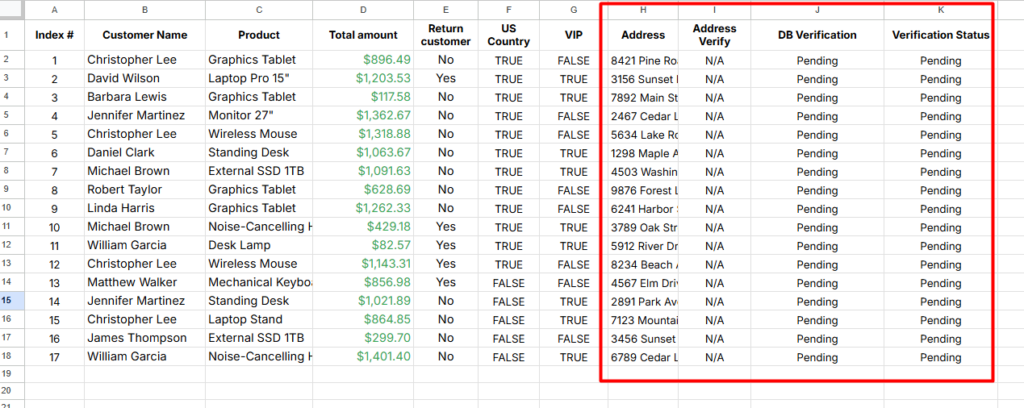
We’ve lists of customer data, We need to verify their address and update the Verification Status as Order Approved
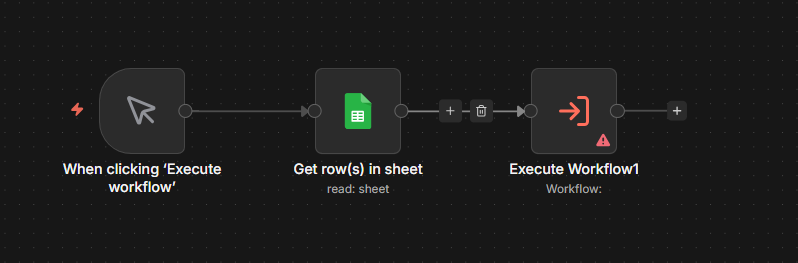
Let’s create the workflow
- Add a Manual trigger
- Read the sheet – Spreadsheet with customer detail
- Execute the sub-workflow – We validate the address in a different workflow
- Update the
Verification StatusasOrder Approved(This is the final output)
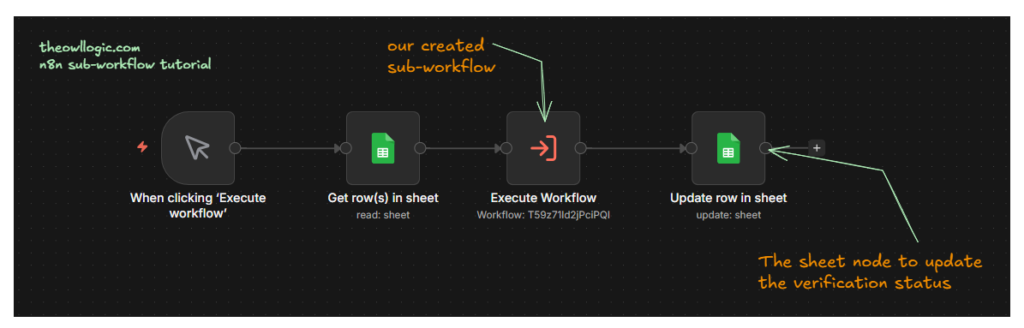
1. Add a Manual Trigger + Google Sheet (Read)

2. Add Execute Workflow Node
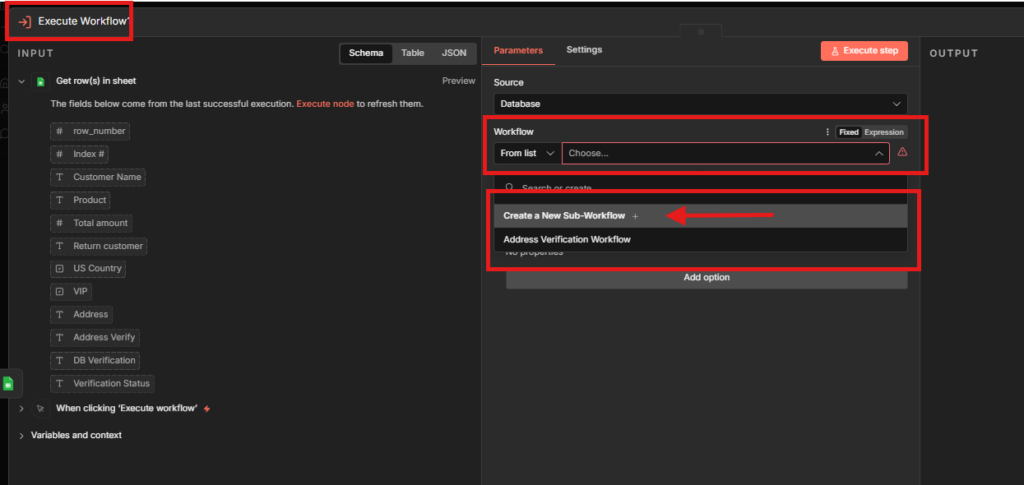
Go to Execute Workflow node, and select the Workflow, either Create a new Sub-Workflow or use the existing one. I create a new.
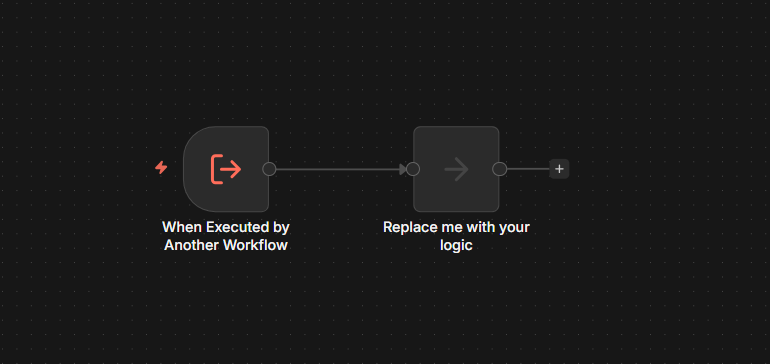
Once you selected the created a new, then n8n will opening up a new tab with that workflow.
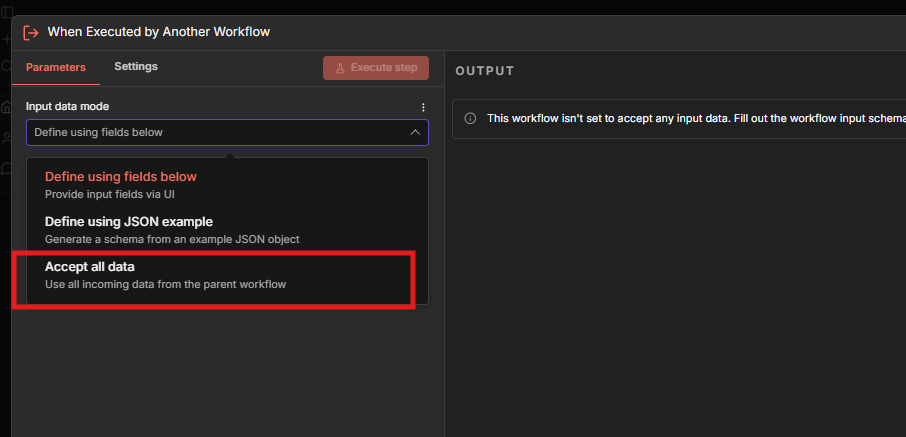
In the new created sub-workflow, you have to add the Input data mode, for this tutorial, I go with Accept all data which means fetch all incoming data from the parent workflow.
Now you’ll see like this in your sub-workflow. and make sure to Save and Publish your sub-workflow otherwise it will throw errors.
3. Adding the Core Logic
We need to validate only for new customers,
- in our customer sheet, there is a column called “Return Customer”
- which means we can validate it with. If return customer is “Yes” then we don’t need to validate his/her address.
- If it’s “no” then we need to just validate it.
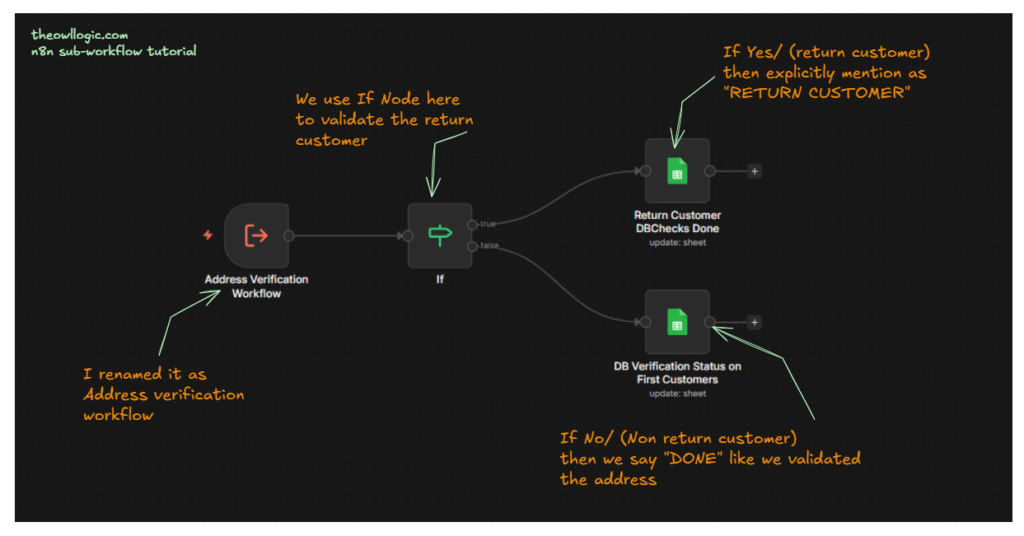
4. Connecting Final Sheet Update Node
Now, we are going to connect the final the sheet node to update the verification status to Order Approved
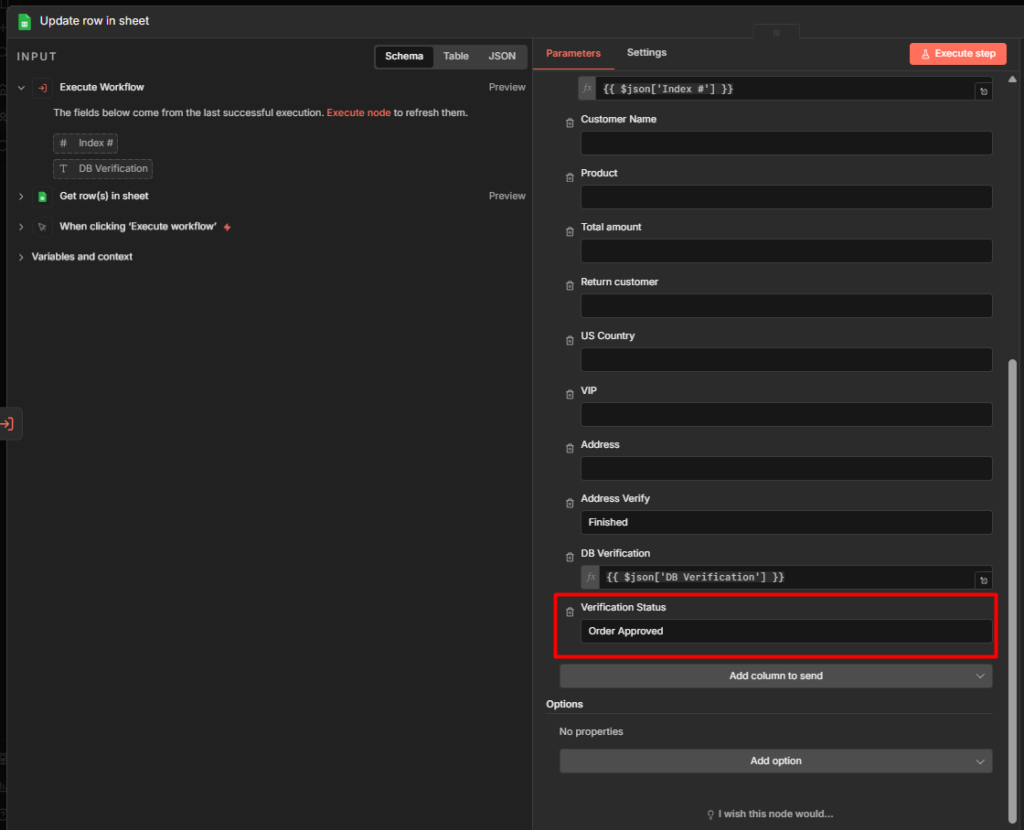
Go to Update row in a sheet – make sure to match the columns, and change the verification status to Order Approved.
5. Execute the Parent Workflow
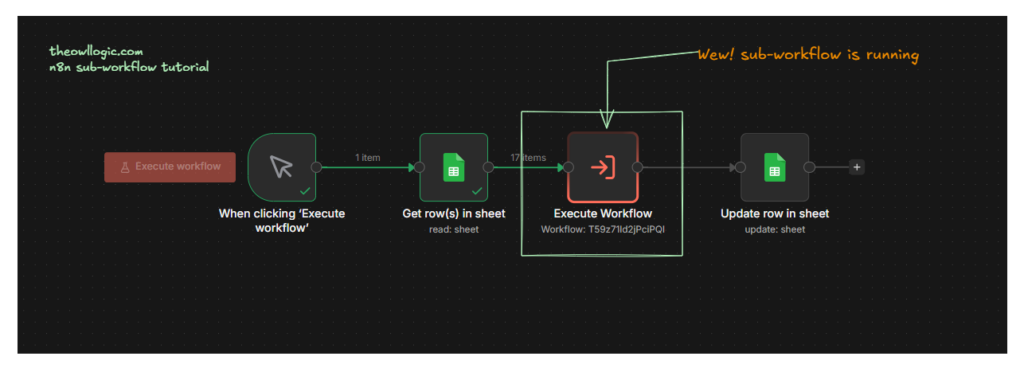
Well, the sub-workflow is executing on its own and the parent workflow on-halt because child-workflow must pass down the data to the parent.
What happened in the sub-workflow? aye, let’s see it.
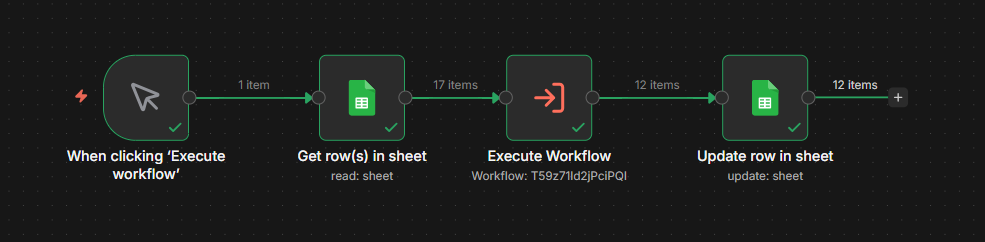
Go to your sub-workflow, and executions to see all the data output.
this is the final output, and yeah, This is not a big tutorial workflow, yet this gives you a glimpse on when to use sub-workflow.
Passing Data Between Workflows
The trickiest part of sub-workflows is getting data in and out correctly.
Sending Data to the Sub-Workflow
When the parent workflow calls a sub-workflow, it passes data through the execute Sub-workflow node.
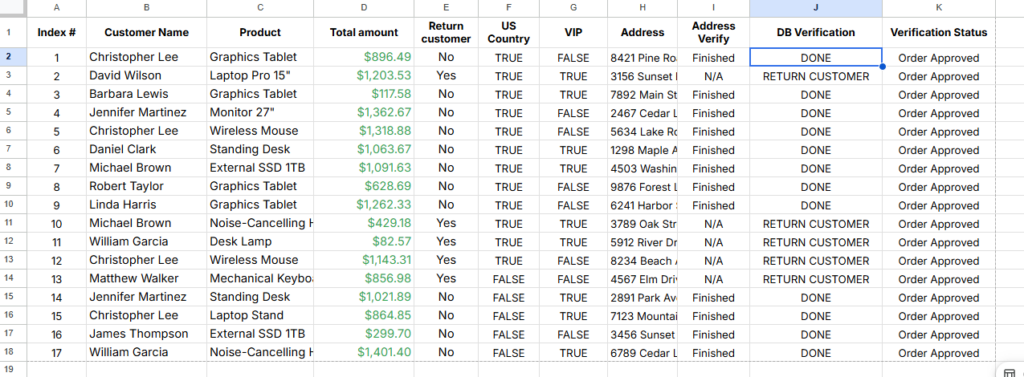
In our tutorial example, the parent workflow reads 17 customer records from Google Sheets. When it hits the Execute Sub-Workflow node, those 17 records get sent to the child workflow.
The child workflow receives this data in it’s trigger node – the Execute Sub-workflow Trigger (also called as “When Executed by Another Workflow)
// Parent sends these 17 customer records:
[
  {
    "Customer Name": "Christopher Lee",
    "Product": "Graphics Tablet",
    "Return Customer": "No",
    "Address": "8421 Pine Road"
  },
  {
    "Customer Name": "David Wilson",
    "Product": "Laptop Pro 15",
    "Return Customer": "Yes",
    "Address": "3156 Sunset Lane"
  }
  // ... 15 more records
]

// Child workflow receives all 17 records in the trigger node
If you set the Execute sub-workflow mode to “Run once with all items“, the sub-workflow gets all 17 records in one executions.
If you set it to “Run once for each item“, the sub-workflow runs 17 times – once per customer record.
Receiving Data From The Sub-Workflow
Here’s where people get confused, (yes, I did too, so please you don’t)
The Sub-Workflow’s last node output becomes the parent workflow’s Execute Sub-Workflow node output.
Not the input. Not some middle node. The final node.
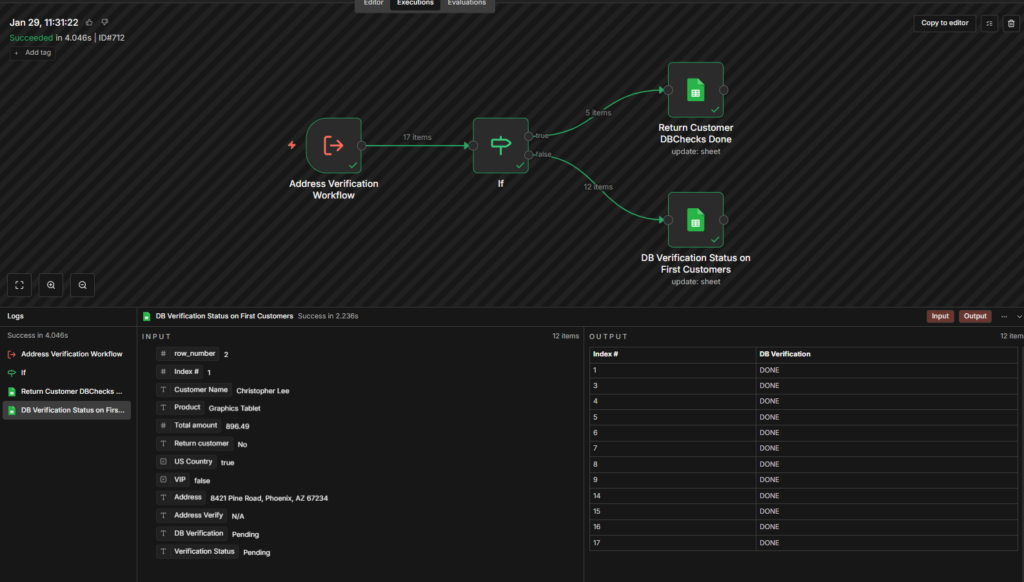
In our tutorial, the sub-workflow ends with two Google Sheet updates nodes (one for return customers, one for new customers). The combined output from both update operations return to the parent workflow.
Let’s say the sub-workflow processed 17 customers
- 5 return customers went through the TRUE path
- 12 new customers went through the FALSE path
- Both paths updated their respective sheet columns
Parent workflow receives all 17 updated records
// Sub-workflow returns this to parent:
[
  {
    "Customer Name": "Christopher Lee",
    "DB Verification": "DONE",
    "Verification Status": "Order Approved"
  },
  {
    "Customer Name": "David Wilson",
    "DB Verification": "RETURN CUSTOMER",
    "Verification Status": "Order Approved"
  }
  // ... 15 more updated records
]
In the parent workflow’s next node (the final Update row in sheet), you access this data usig
{{ $json["Customer Name"] }}
{{ $json["DB Verification"] }}
{{ $json["Verification Status"] }}
Common mistakes: people try {{ $json.output.field}} or goes through nesting, It’s just {{ $json.field }}. The sub-workflow output is the JSON object.
What Happened In Our Tutorial? (Complete Flow)
- Parent workflow reads 17 customers records from Google Sheets
- Parent workflow sends all 17 records to sub-workflow
- Sub-workflow receives 17 records in its trigger
- Sub-workflow checks “Return Customer” column using IF node.
- Sub-workflow splits data: 5 return customers (TRUE), 12 new customers (FALSE)
- Sub-workflow updates appropriate columns for each group
- Sub-workflow returns all 17 updated records to parent
- Parent workflow receives 17 records with updated verification data
- Parent workflow updates final “Verification status” column to “Order Approved”
Frequently Asked Questions (Real)
I’ve an existing nodes in placed primary workflow? How do I copy instantly?
Yes, you can do this, make sure to highlight the nodes you want, and right click, select the option as create sub-workflow. This way faster than manual setup when refactoring existing workflows.
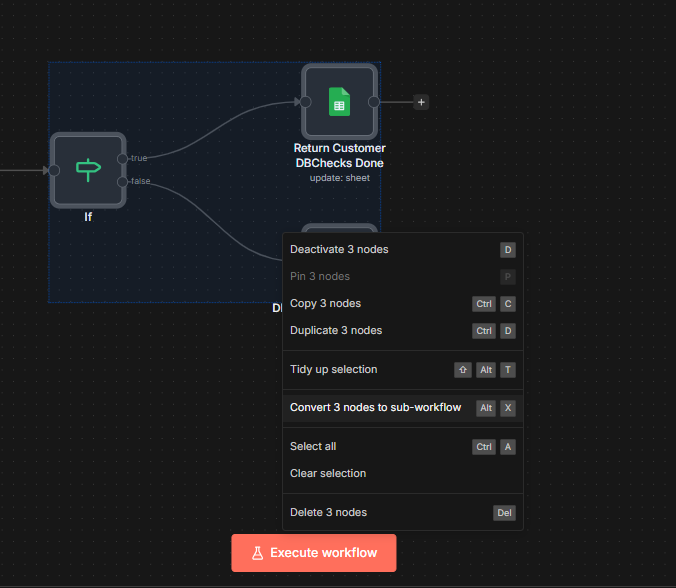
Or press alt + x
What You Just Learned
Sub-workflows solving specific-problems, reusing logics, breaking up massive workflows or isolating testable components
They’re not always the answer. Sometimes an IF node does the job better. Sometimes keeping everything in one workflow is simpler.
But when you find yourself copying node groups between workflows, or when your workflow canvas looks like a tangled mess, that’s when sub-workflows shine.
Start with something simple. Extract your most-copied logic into a sub-workflow. See how it feels. The expand it from there.