
n8n is one of the few genuine bits of magic I’ve experienced in automation.
The problem is, when I started learning it, there weren’t many resources beyond YouTube videos, and a lot of those built workflows with 50 nodes for something that could’ve been done in 10.
n8n keeps growing too, and I wouldn’t be surprised if some of what takes 10 nodes today gets done in 5 a year or two from now.
There wasn’t enough material out there for someone without a technical background, so I taught myself everything from scratch.
I documented all of it in Obsidian, every way to install n8n, Docker, npm, all of it, every core module I had to actually master, every dark corner nobody bothered writing about.
I went through all of it to automate my own businesses.
That’s why this guide exists.
Not another video where someone tells you to comment “workflow” and DM them for the file.
Not another overcomplicated tutorial stacking nodes you don’t need.
This is everything I learned the hard way, laid out in the order you’ll actually need it. Consider this your one source of truth to get onboard with n8n properly.
What Is n8n? The Short Answer
n8n is an open-source workflow automation tool that connects apps, APIs, and AI models through a visual, node-based editor, no code required.
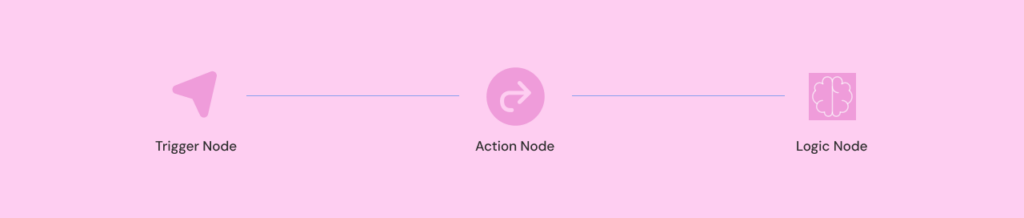
You build a workflow by chaining nodes together:
- a trigger node starts it (a schedule, a webhook, a new row in a spreadsheet),
- action nodes do the work (send an email, call an API, update a database),
- logic nodes control which path the data takes (conditions, loops, merges).
You can self-host n8n for free on your own server, or use n8n Cloud if you don’t want to manage infrastructure yourself.
Getting comfortable with n8n comes down to five things, in order:
- installation,
- the core building blocks,
- credentials,
- error handling
- connecting real services.
Everything else builds on top of that foundation.
Should You Use n8n? Where It Actually Fits
Before you install anything, it helps to know what you’re getting into.
n8n sits between two extremes.
On one side you’ve got tools like Zapier, dead simple, but expensive once you scale past a handful of zaps, and limited in how much logic you can build into a single flow.
On the other side is custom code, total control, but you’re writing and maintaining everything yourself.
n8n gives you most of the control without most of the coding.
You still get a visual canvas, but you can drop in actual JavaScript when a node can’t do what you need, build conditional branches, loop through datasets, and call any API directly.
If you’re trying to decide between n8n and Make specifically, since they’re the two closest competitors, I broke that comparison down here.
This guide assumes you’re starting from zero.
If you already know what n8n is and just want to get it running, skip ahead to installation.
Step 1: Get n8n Running, Self-Hosted vs. Cloud
Before you install anything, you need to make one decision: self-hosted or Cloud.
Self-hosting means running n8n on your own server, a VPS, a Raspberry Pi, your own machine. It’s free, you control your data completely, and there’s no execution limit.
But it also means you’re the one keeping the server updated, handling SSL, and fixing it when Docker decides not to cooperate.
I cover the full decision framework, cost, control, and when each option actually makes sense, in this guide to choosing between n8n self-hosted and Cloud.
If you’re not technical, or you just don’t want infrastructure to be your problem, n8n Cloud removes that entire layer.
You sign up, you get the same workflow editor, and updates, backups, and uptime become someone else’s job.
For most non-technical beginners, that trade is worth it, the hours you’d spend keeping a server alive are better spent actually building workflows.
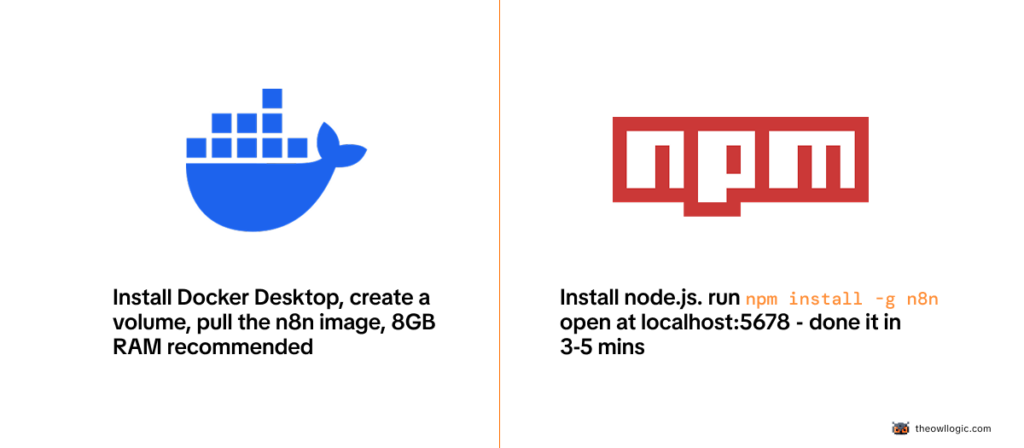
Once you’ve made that call, installing the self-hosted version, Docker or npm, Windows or Mac, is covered step by step in my 2026 install guide.
I walk through both methods since Docker trips up more beginners than it should.
Step 2: Build Your First Workflow
Once n8n is running, resist the urge to immediately build something ambitious.
Build something tiny first, a manual trigger that creates a piece of data and shows it back to you. That’s it.
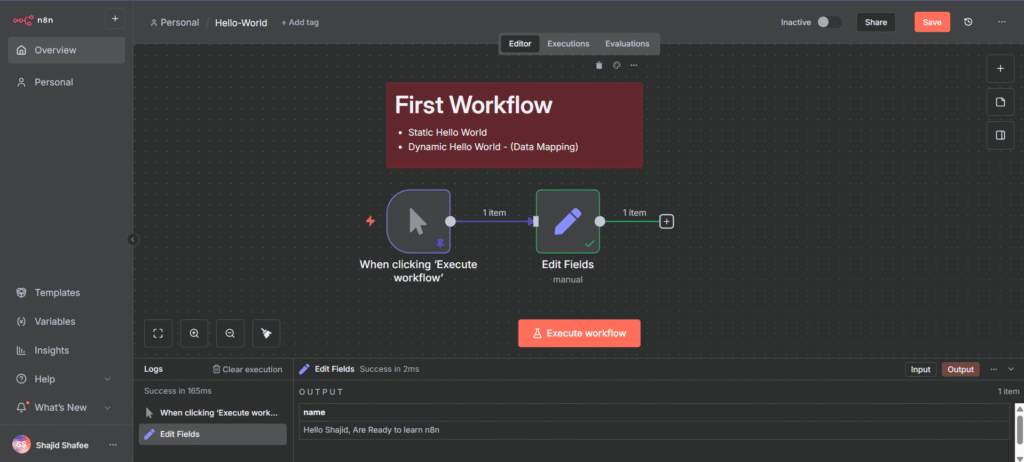
I walk through that exact first build, step by step, in my hello-world workflow guide.
It takes about five minutes, and it’s the fastest way to get comfortable with how the canvas, nodes, and execution panel actually work before you add any real complexity.
Step 3: Understand How n8n Actually Thinks
Every workflow in n8n breaks down into the same three pieces:
- a trigger that starts things,
- action nodes that do the actual work,
- logic nodes that control which path the data takes.
Data flows from node to node as JSON, and the next node always receives whatever the previous one output.
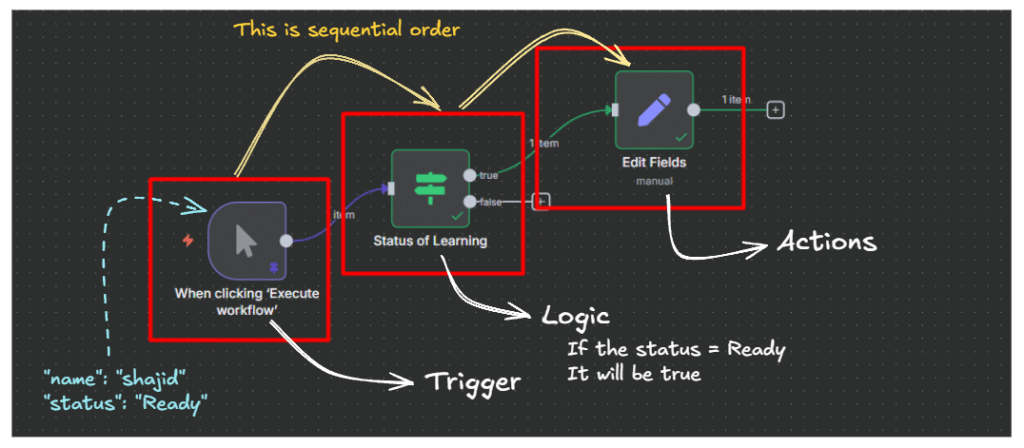
This is the single most important concept to understand before you build anything real, not memorize, understand.
I go through every node type, what each one does, and a hands-on exercise to watch data transform in real time in my full breakdown of n8n workflows, nodes, and data flow.
Step 4: Connect Your Credentials
n8n needs permission to act on your behalf, to send emails through your Gmail, post in your Slack, write to your Google Sheet.
That permission comes from credentials, and setting them up correctly the first time saves you from re-authenticating every other node you build.
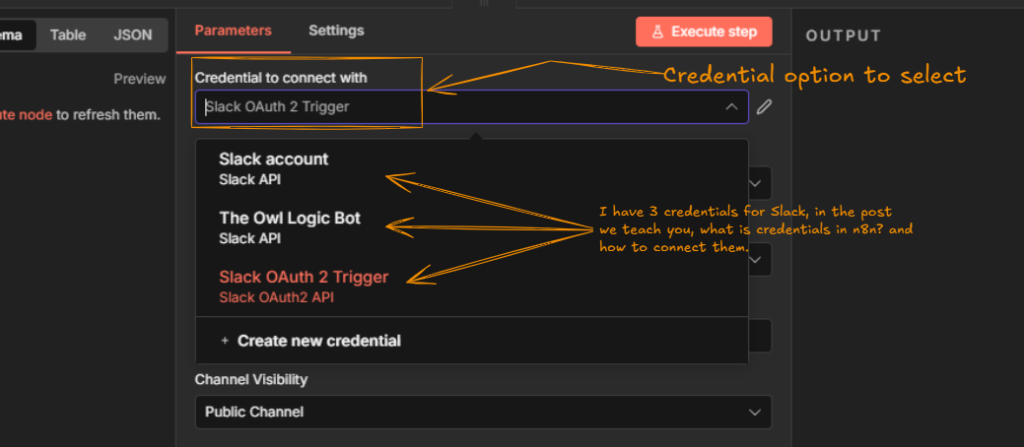
My credentials and service setup guide covers exactly how to connect the services you’ll use constantly.
And if you’ve already set up credentials and noticed they keep expiring every week or two, that’s a specific OAuth token problem with a specific fix, I cover it here.
Step 5: Plan Before You Build
The biggest mistake I see beginners make isn’t a technical one, it’s opening the canvas before they know what they’re actually trying to build.
You end up with workflows that work in testing and fall apart the moment real data hits them.
Before you build anything beyond hello-world, spend ten minutes mapping out the trigger, the steps, and the failure points on paper first.
I lay out the exact process I use in this guide to planning an n8n workflow before you touch a single node.
Step 6: Give Your Workflows a Brain
Most real automation isn’t a straight line, it’s a decision tree.
Send a different email if the order is over $100.
Skip a step if a field is empty.
Route a message differently depending on which channel it came from.
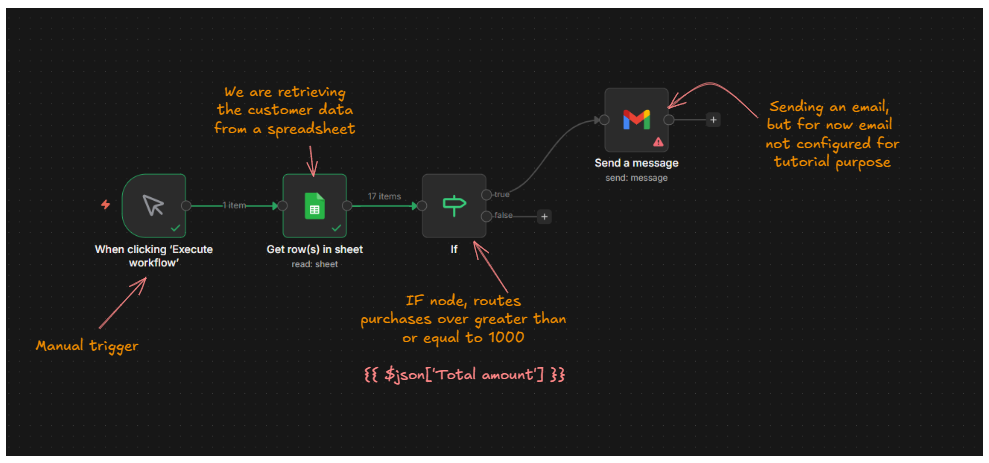
That’s what IF and Switch nodes are for. I cover both, with working examples, in this guide to building conditional logic in n8n.
Step 7: Work With Real Data
At some point you’ll need to reference data from a previous node, combine two fields, or transform a value before it’s used somewhere else.
That’s what expressions are, and they trip up almost every beginner the first time they see the syntax.
I wrote the guide I wish existed when I was learning this: a complete, practical walkthrough of n8n expressions, from the basics to the patterns you’ll actually reuse.
Step 8: Process Things in Bulk
Sending one email is easy.
Sending the same email to 500 contacts without crashing your workflow or hitting a rate limit is a different problem entirely, and that’s where loops come in.
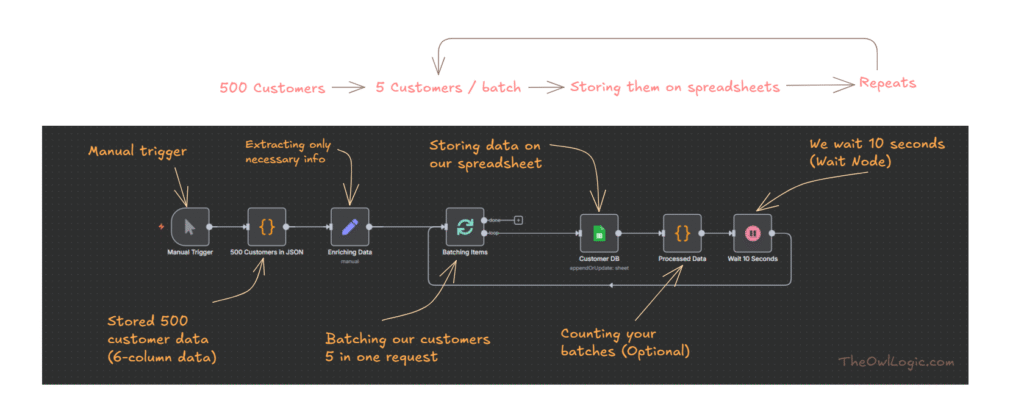
Loops aren’t something you need on day one, but you will need them eventually. I cover exactly when you actually need one, and when you don’t, in this guide to using n8n’s Loop Over Items node.
Step 9: Handle It When Things Break
Every workflow you build will eventually fail.
An API will go down for twenty minutes, a website will change its structure, a field you expected will come back empty.
That’s not a sign you did something wrong, it’s just what happens at scale.
What separates a fragile workflow from a production-ready one is whether it can detect the failure, recover, and keep running.
I cover the three techniques that handle 90% of real-world error scenarios in how to handle errors in n8n like a pro.
Step 10: Trigger Workflows From Outside
So far, everything’s been triggered manually or on a schedule. Webhooks flip that, instead of your workflow checking if something happened, the other app tells you the moment it does.
I walk through setting one up for real, including sending WordPress form submissions straight into Google Sheets and testing it locally with ngrok, in my full guide to webhooks in n8n.
Step 11: Talk to Any Service
Not every service has a dedicated n8n node.
When that happens, the HTTP Request node is what connects you to literally anything with an API.
It’s more advanced than the nodes you’ve used so far, and I’d genuinely hold off on it until you’re comfortable with the basics above.
When you’re ready, my guide to the HTTP Request node walks through connecting to any API, step by step.
Step 12: Connect the Tools You Already Use
This is where n8n starts paying for itself, connecting the apps you’re already using every day.
- If your data lives in spreadsheets, here’s how to connect Google Sheets to n8n.
- If your team lives in Slack, here’s how to send messages and trigger workflows from Slack.
- If you’re using Airtable as your database, here’s how to connect, read, create, and update Airtable records.
- If you want bots and notifications in Telegram, that’s covered too.
Pick whichever one matches your actual stack and start there, you don’t need all four.
Step 13: When a Spreadsheet Isn’t Enough
Google Sheets and Airtable work great until your data gets relational, or you need real queries, or you’re processing thousands of rows and Sheets starts choking.
That’s the point where I moved to Supabase, Postgres without having to manage Postgres yourself.
I cover the full integration, from setup to actual queries, in my n8n and Supabase guide.
Real Workflows Worth Building First
Once the fundamentals click, the fastest way to actually learn n8n is to build something with a real, immediate use. Two places I’d start.
A follow-up email sequence is one of the most useful first “real” workflows you can build, it touches triggers, waits, and conditional logic all at once.
If you’re still looking for ideas, I put together 50 boring, repetitive tasks you can automate with zero coding.
Most beginners find at least five of these apply directly to something they’re already doing manually.
Keep Things Reliable at Scale
Once your workflows are doing real work, two problems show up that beginners rarely see coming.
The first is rate limits, most APIs cap how many requests you can send per minute, and exceeding that breaks your workflow.
I cover throttling and retry logic here, plus a more advanced setup using Upstash Redis as a dedicated rate limiter if you’re running multiple workflows against the same API.
The second is workflows getting too big and tangled to maintain.
Sub-workflows solve that by letting you build reusable, modular pieces instead of one giant canvas.
And once you’ve built workflows you’d be upset to lose, back them up. I run mine through GitHub automatically, here’s the exact setup.
Add AI to Your Workflows
This is where n8n’s growth has been fastest.
AI agent workflows let you build something that doesn’t just follow fixed steps, it reasons about what to do next.
If you’re ready to build your first one, I cover the full step-by-step build in this guide to AI agent workflows in n8n.
Two nodes you’ll run into immediately: the Simple Memory node, which lets your agent actually remember context across a conversation, and the Summarization Chain, which condenses long content before you feed it to a model.
Before you start, read what I wish I knew before building my first AI agent in n8n, it’ll save you from a few mistakes I made the hard way.
Is n8n Still Right for You?
By this point you’ve got enough n8n under your belt to know whether it’s actually the right tool for what you’re trying to do.
If you came from Zapier and you’re wondering whether the switch was worth it, here’s the honest comparison.
And if n8n still doesn’t feel right after everything above, I tested through 50+ workflows before settling on my actual stack, here are the five alternatives actually worth considering.
I’ll also say this honestly: a lot of people give up on n8n in the first few weeks, and it’s usually for the same handful of reasons.
I wrote about exactly why, and how to not be one of them, here.
Final Thoughts
I’m not going to pretend n8n is simple.
It isn’t, not at first.
But the curve is shorter than it looks from the outside, and most of what makes it feel hard is just not knowing which of the hundreds of nodes you actually need for your specific problem.
That’s really what this guide is, the map I wish someone had handed me when I started.
Pick the section that matches where you’re stuck right now, go deep on that one guide, then come back here for the next step. Every workflow you build from here gets easier than the last one.